Posted on

Its a Baby Girl Arrow Quilt with Cricut

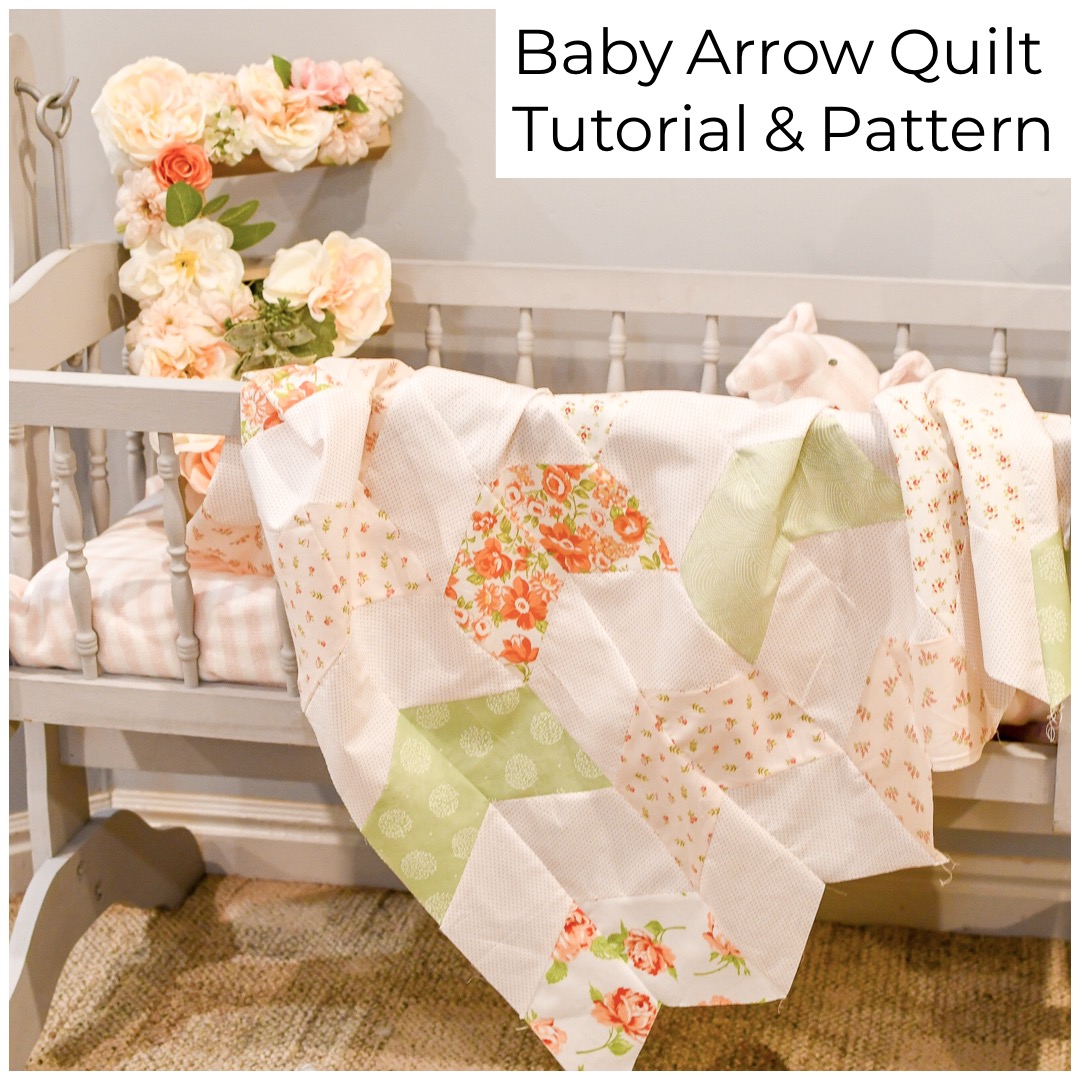
Baby Arrow Quilt Tutorial & Pattern with Cricut

It’s a Baby Girl Arrow Quilt with Cricut

We’re on the eve of expecting our first grandchild!  Soooooo…. I just had to make a Baby Girl Arrow Quilt!

Fabric for the Baby Girl Arrow Quilt with Cricut

First step:  Shopping with Mom to three quilt stores!  I loved learning Ashley’s vision for Baby Ellie’s nursery!

Beautiful Ashley momma to Ellie photograph by Sally June Photography in Salt Lake City, Utah.

What could be more fun than shopping with my daughter in law for fabric!  I loved how Ashley selected fabrics from different designers and brands combining a real delicate touch of peaches, pinks, eucalyptus greens and whites.  Photo by Sally June Photography find her on Instagram!

Cutting Fabric in the shape of diamonds for a baby girl quilt!

Second step:  Pick Ashley’s brain to design a quilt that matches the style she envisions!  Ashley likes the shape of diamonds that then transition into arrow….  Soooo off to Cricut Design Space I go!

Playing around with diamonds to make arrows for a quilt in Cricut Design Space

Step Three:  Playing around with diamonds to make arrows for a quilt in Cricut Design Space!  The Cricut Design Space Quilt file is free here:  

Sewing together diamonds into an Arrow Baby Quilt with the Cricut

Step Four:  Can you see the vision?  But wait….  we skipped a step – Let’s go back to cut the diamonds out with the Cricut Rotary Blade for Baby Ellie!

Cutting diamond shaped fabric for a baby arrow quilt with the Cricut. Quilting with Cricut!

You could say I “Cricut” cut Ashley’s seven most favorite fabrics in the shape of diamonds for Baby Ellie.  Quilting with Cricut to welcome Baby Ellie into the world!  She is coming really soon – in fact due in 4 days!  Thank goodness this Cricut cuts fabric fast and accurate!  Accurate is important to try to stitch theses diamonds together quickly!  Love using the tiny rotary cutting blade in the Cricut cutting machine.  See additional step by step Cricut Design Space layout images below.

Two diamond shapes put together make an arrow head for a baby arrow quilt.

You can see by placing together two diamond shaped fabrics on point it looks like an arrow head.

Offsetting the Baby Arrow Head with a Polka Dot Quilt Fabric.

For the design of this quilt we are offsetting the Arrow Head Quilt Blocks with background polka dot fabric.   The background fabric will subtly help the arrow heads to pop from the quilt design.

How to sew the Baby Arrow Head Quilt together.

It may not feel right but you have to separate the arrow heads and sew together the diamond blocks in a long row.  After stitching two long rows you can then put the arrow heads back together.

Sew together two offset diamonds for an Arrow Baby Quilt. Do you see the little 1/4 inch "dog ears" that allow you to sew them into a straight line?

Sew together two offset diamonds for an Arrow Baby Quilt.  Do you see the little 1/4 inch “dog ears” that allow you to sew them into a straight line?

Take your squares over to your sewing machine to stitch together for your Baby Arrow Quilt

Take your squares over to your sewing machine to stitch together for your Baby Arrow Quilt.  I love keeping my Cricut Maker next to my sewing machine!  It cuts fabric out as I sew it together!

Sewing together long rows of diamonds for a Baby Arrow Quilt cut out by the Cricut Maker with the Rotary Cutting BladeSewing together long rows of diamonds for a Baby Arrow Quilt!

Now its time to sew together the long rows of diamonds together making the Baby Arrow Quilt. Quilting with Cricut.

Piece the rest of the quilt top together!  You will have five rows of arrows horizontally and 10 rows of arrows vertically.

How to quilt a Baby Arrows Quilt cut out with the Cricut. Quilting with Cricut.

Now time to brain storm how to quilt the quilt!  What suggestions do you have?  This is the rocking swivling reclining chair to comfort baby in Ellie’s nursery!  After stitching together this quilt top, it’s time to quilt the layers!  Ohhhhh…  I can’t wait to see this baby girl with my son Nick and his beautiful wife Ashley!  It’s going to be a brand new family!   I think I spy some darling baby shoes on the dresser waiting paitently for a Baby Ellie!

New baby shoes made with the Cricut! I can't believe I might be able to put cobbler on my crafting ability list!

New baby shoes made with the Cricut! I can’t believe I might be able to put cobbler on my crafting ability list!  This is a Simplicity Pattern available in Cricut Design Space.  I can’t wait to share how I made these shoes!

I can't believe the power of the Cricut Rotary Cutting Blade! I can make shoes with some felt, fabric and the Cricut. Sewing with Cricut. I think these shoes are just enchanting!

I also made a darling baby onesie using another Simplicity Pattern in Cricut Design Space!  Ohhhh the power of the Cricut Rotary Blade, fabric, felt and wonder under!  I feel like a super hero with the ease of the Cricut!  I don’t think I would have ever tried to make a pair of shoes without the handy Cricut next to my sewing machine!  My partner in creativity!

Baby Onesie made with the Cricut Rotary Blade with Simplicity Pattern in Cricut Design Space

Baby Onesie made with the Cricut Rotary Blade with Simplicity Pattern in Cricut Design Space.  Accented the white baby onesie with roses.

Subscribe to Sttitches Quilting -Deanna Wall to get all the upcoming tips on these projects!  Follow Stitches Quilting -Deanna Wall for Live Videos on Facebook, Instagram and YouTube Tutorials!  I’m SEW excited to be sewing things for Baby Ellie and have tons of new projects coming for you along with all the details of our Boho Floral Baby Shower I hosted with lots of Cricut Creations to decorate the nursery and have some fun at the baby shower!

Quilting with Cricut:  Additional Tips and Tricks for Cricut Design Space and the Baby Arrow Quilt:

Change all your cutting mats from the default 12 x 12 size to 12 x 24 inch size.

Move Diamond to another Cricut Cutting Mat

After you open the Baby Arrow Quilt in Cricut Design Space, click on the three small dots in the left hand corner of the diamond.  Select “Move to Another Mat”.

In Cricut Design Space Select which cutting mat you want to move the design to

Select which mat you want to move the diamond to.  You can arrange 8 diamonds on one 12 x 24 inch Fabric Grip Mat.

Cut a 9 x 22 inch strip of fabric to place on your Fabric Grip Mat

Now you only have to cut a 9 x 22 inch piece of fabric to cut 8 diamonds.  That’s just half a fat quarter or work with a 1/4 yard of fabric on each mat.  Pretty convenient eh?

Quilting with Cricut

It’s amazing how you can use Cricut Design Space basic shapes to design quilts.  Using Cricut Deisgn Space is FREE – all you do is create a free account with an email address.  You can access it on your computer, laptop, smart phone or iPad.  It was easy to design the Baby Arrow Quilt and then color and arrange the quilt blocks as a vision board.  Try it out and let me know what you think!  It’s a great way to experiment using Cricut Design Space intuitive features.  Quilting is easy to do – especially with the Cricut cutting out your fabric.  It’s usually just straight lines.

I have lots of free tutorials on how to use the Cricut on my website and social media channels along with free patterns with SVG files.

I’ll post pictures of Baby Ellie as soon as she arrives!  Along with pictures of the quilted quilt and all the other goodies I’m making!  Can’t wait to share with all of YOU!  Any suggestions?

Join our Facebook Cricut Maker Quilt & Sew Group!  I’d love to see what you are making and be inspired by you!  I’m also available to ask any quilting or sewing questions using Cricut!

Happy Stitching!

Deanna Wall Stitches Quilting Stitching Through LifeDeanna Wall Stitches Quilting TutorialsStitches Quilting Online Neighborhood Quilt Store & Blog


This is a sponsored conversation written by me on behalf of Cricut. The opinions and text are all mine.

Posted on

Quilted Cookie Sheet Hot Pad Tutorial

Quilted Cookie Sheet Hot Pad Tutorial & FREE Pattern

Make your very own practical Quilted Cookie Sheet Hot Pad for getting large items out of your oven.

Download your Quilted Cookie Sheet Hot Pad Pattern HERE

Quilted Cookie Sheet Hot Pad Pattern Page 1 Cover Material Needed and Cutting Instructions for your Quilted Cookie Sheet Hot Pad Quilted Cookie Sheet Hot Pad Page 2 Cut Your Fabric Stitch your fabrics together and quilt your handles for your Cookie Sheet Hot Pad

Quilted Cookie Sheet Hot Pad Page 3 Stitch Your Handles Quilt the Cookie Sheet Hot Pad Handles with matchstick quilting Quilted Cookie Sheet Hot Pad Page 4 Add Batting Quilt Layer your fabrics together for the 11 x 26 inch rectangle section of your Quilted Cookie Sheet Hot Pad Quilted Cookie Sheet Hot Pad Page 5 Layer the Hot Pad Add your handles to your Quilted Cookie Sheet Hot Pad and then bind your Hot Pad Quilted Cookie Sheet Hot Pad Page 6 Add Your Handles Be sure to follow Stitches Quilting for additional patterns and tutorials Quilted Cookie Sheet Hot Pad Pattern Video &Quilted Cookie Sheet Hot Pad Pattern Video & Blog Post Instructions Blog Post Instructions

One of our next pattern coming out in March 2019 will be the cross back long Apron! Quilted Cookie Sheet Hot Pad Page 8 Apron Cross Back The Quilted Cookie Sheet Hot Pad is great for getting large items out of the oven.  The Hot Pad is versatile in being a trivet or table decor too.
Be sure to join our Everyone Can Quilt Group to share pictures of what you make! What fabric combinations would you use for your hot pad?


Deanna Wall Stitches Quilting Stitching Through Life Deanna Wall Stitches Quilting TutorialsStitches Quilting Online Neighborhood Quilt Store & Blog

Posted on

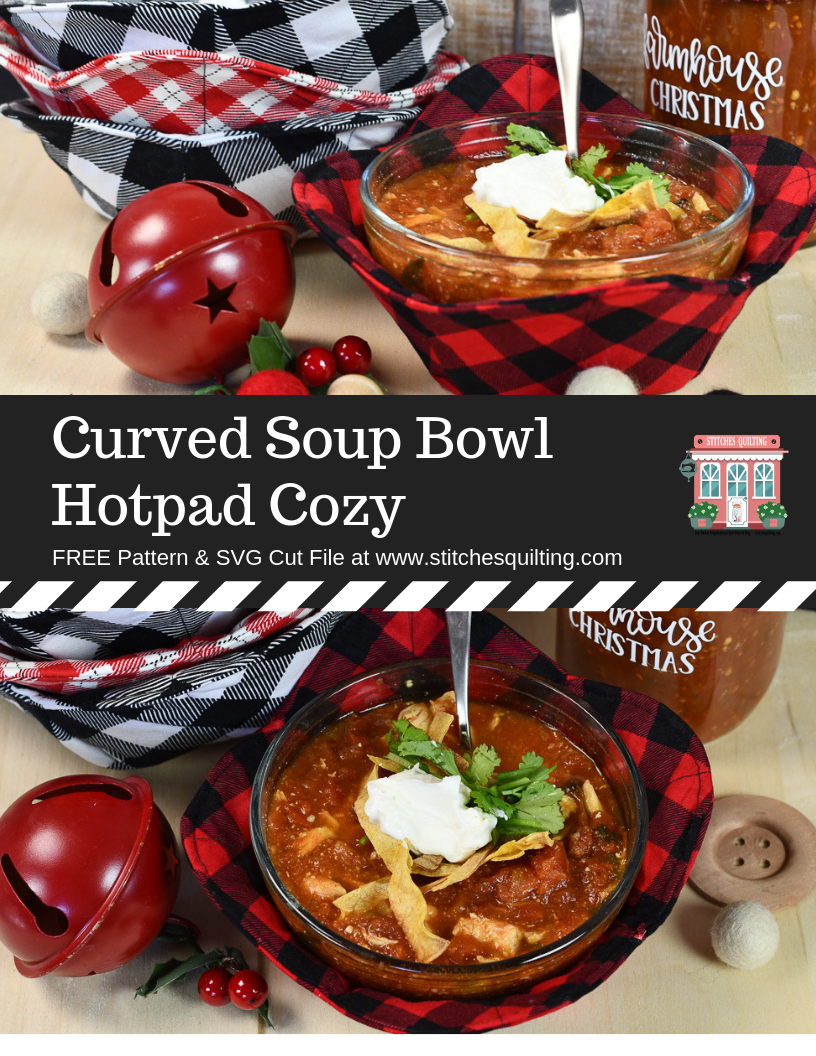
Curved Soup Bowl Hot Pad Cozy Tutorial

Curved Soup Bowl Hotpad Cozy Cover

Curved Soup Bowl Hot Pad Cozy Tutorial

Download your PATTERN HERE!

Let’s make some Curved Soup Bowl Hot Pad Cozies!  Are you ready!

Curved Soup Bowl Hotpad Cozy Page 2 Cut Fabric Squares

Let’s get our 10 inch square cut!  Easy Peasy!

Curved Soup Bowl Hotpad Cozy Page 3 Stitch Your X

Stitch your “X” on your fabric and batting!

Curved Soup Bowl Hotpad Cozy Page 4 Tapered Markings

Draw those tapered lines!  I am a sharpie marker girl!  You can you any pen you want.

Curved Soup Bowl Hotpad Cozy Page 5 Stitch Tapered Markings

Stitch those marked tapered line and trim.


Curved Soup Bowl Hotpad Cozy Page 6 Mark Your Curved Edges

Find a curved item you would like your bowl shaped as and mark one side of the bowl cozy.

Curved Soup Bowl Hotpad Cozy Page 7 Stitch Blue Curved Lines

Stitch on your curved line leaving a 2 inch opening to turn your bowl inside out.

Curved Soup Bowl Hotpad Cozy Page 8 Stitch & Turn Inside Out

Be sure to Download your FREE Pattern for the Curved Soup Bowl Hot Pad Cozy

Show us what you make by following us on Facebook, Instagram and YouTube Social Media.  Lots more patterns and giveaways coming your way!

Join our Everyone Can Quilt Facebook Group to share pictures of what you make and ask questions!

Happy Stitching – Can’t wait to see you ONLINE!

Deanna Wall Stitches Quilting Stitching Through Life

Deanna Wall Stitches Quilting TutorialsStitches Quilting Online Neighborhood Quilt Store & Blog

Posted on

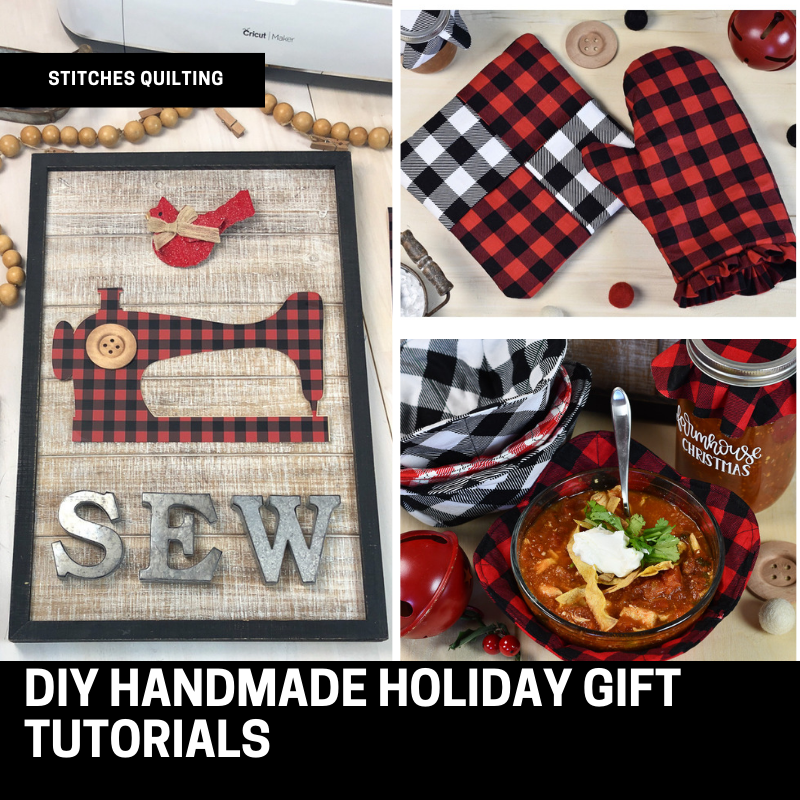
DIY Handmade Holiday Gifts Tutorial

Make your own DIY HANDMADE HOLIDAY GIFT TUTORIALS for friends and family

DIY Handmade Holiday Gifts Tutorial

Making Handmade Holiday Gifts makes me excited for Holidays!  Creating Holiday gifts with the Cricut Maker just gives a professional look and cut!  

Soup Bowl Cozy – fabric sewing

Cricut Maker Buffalo Plaid Rounded Soup Cozies (2)

Curved edges on the quilted cozy soup bowls softens their look.   They are so handy to make a set and stack on top of each other.  

Cricut Maker Buffalo Plaid Rounded Soup CoziesFor the free Curved Soup Bowl Cozies subscribe below!  Nest together and stitch on the blue line!  


Download Your Curved Soup Bowl Hotpad Cozy Pattern PDF

Enjoy a 9 page pdf pattern download with step by step instructions for the Curved Soup Bowl Hotpad Pattern


Materials needed:  2 - 10 inch fabric squares AND 2 - 10 inch pieces of batting.  {Use all cotton materials for a microwave safe version.  Increase insulation by adding a layer of Pellon Insul-fleece available in the Stitches Quilting online store! )

Soup Bowl Cozy Hot Pad Materials needed 2 -10 inch square of fabric and batting


Or.... have the Cricut Maker in Cricut cut out exact dimensions for you from this FREE Cricut Community file!  hmmmmm... so many possibilities. 

Soup Bowl Cricut Rounded Cozy Hot Pad


Especially fun for making a bunch of these soup bowl cosies as a DIY handmade holiday gift for neighbors, friends or family!  

If you don't cut out your soup fabric bowls on the Cricut Maker then use this handy guide from a 10 inch squares of fabric!  

  1.  Stitch an "X" on each 10 inch fabric square with a piece of batting behind it.Soup Bowl Hot Pad Cozy Stitch an X from point to point
  2. After stitching your "X" fold your fabric square in half.  Using a ruler, mark two dots 1 inch from the fold and 2 inches from the top of the batting side.  Draw a line meeting the two dots. Soup Bowl Hot Pad Cozy Tapered Markings
  3. Repeat this step on all four sides of your fabric squares.   This will be a stitching line to taper your bowl.  Remember one inch from the fold and two inches from the top.  
  4. Stitch on the diagonal lines you drew on the batting side.  
  5. Trim the excess fabric.
  6. Curve your square corners with a bowl to mark your stitching line.   Use a bowl to trace the edges of your quilted 10 inch squares or download your pattern here!Soup Bowl Rounded Hot Pad Cozy Instructions
  7. Nest your tapered bowls together with right sides together.  
  8. Stitch on your blue curved lines with right sides together on the straight edge of the curve.Soup Bowl Rounded Hot Pad Stitch Line
  9. Leave a two inch opening on the "straightest" edge of the curve.
  10. Trim the excess fabric from the blue stitching line.  
  11. Turn inside out through the opening.
  12. Top stitch the opening closed then all the way around the top of the Hot Pad Soup Bowl Cozy
  13. Enjoy your Rounded Soup Bowl Cozy Hot Pad with some hot soup or gift this awesome Handmade Soup Bowl Cozy!

CLICK HERE FOR THE COMPLETE Soup Bowl Hot Pad Cozy Tutorial!  


Ruffled Buffalo Plaid Hot Pad Hand Mitt -  Cricut Simplicity Sewing Pattern 

Cricut Maker Buffalo Plaid Ruffled Hot Pad Handmade Gift Standing Up

Love the trendy ruffled edge for the wrist on this Handmade DIY Buffalo Plaid Hot Pad Gift.  

Cricut Maker Buffalo Plaid Ruffled Hot Pad Handmade Holiday Gift with cookies

Check out the Simplicity Hot Pad Pattern available in Cricut Design Space.  

Cricut Maker Buffalo Plaid Ruffled Hot Pad Fabric Cut

Buffalo Plaid Fabric can be purchased from Stitches Quilting online fabric store CLICK HERE.  

Red and Black Plaid Fabrics

EASY Square Hotpads Layered - fabric sewing

Cricut Maker Buffalo Plaid Handmade Gift

Materials Needed:  Easy to make square hot pad made from 6 - 10 inch square pieces of fabric and 2 - 10 inch square pieces of batting. 

Cricut Maker Buffalo Plaid Hot Pads Supplies Needed for Holiday Gifts

  1.  Can you see the order of the fabrics laid out?  Start with a white or muslin square that will not be seen.  Stack your batting 10 inch layer and add a Pellon Insul-fleece Layer for heat resistance if you would like.  Layer with a red square of  buffalo plaid fabric and then layer 4 Folded in half 10 inch squares overlapping staggered on top with the raw edges facing outwards.  

Handmade Holiday EASY Layered Hot Pad

2. Let's review the top layer.  Fold four 10 inch squares into a rectangle.

Handmade Holiday EASY Layered Hot Pad

3.  Match the two red buffalo folded 10 inch fabric squares side to side with folded edges matching each other in the center and raw edges to the outside.  

Handmade Holiday EASY Layered Hot Pad

4.  Overlap, weave and stagger the two black and white folded 10 inch fabric squares through the red buffalo squares in a pattern like closing a cardboard box.  

5.  Stack all your layers in order and stitch around all four sides of the Hot Pad. 

Handmade Holiday EASY Layered Quilted Hot Pad

6.  Peek through your four weaved top layers to turn inside out!  Voila and no need to close!  


Let Us Sew Wooden Snowflake  - Cricut Iron On & Wood Cutting

Let Us Sew DIY Wooden Snowflake Holiday Decor


Check out your local dollar store for raw wooden items to paint.  This wooden snowflake is easy to cut out with your Cricut Maker and the knife blade.  Quickly access this Cricut black iron-on cut file for free in the Cricut Community Design Space!  I love using iron-on with my wood projects!  It looks seamless and beyond professional!  Wouldn't a "sewy or quilty" friend love this snowflake? 

Let Us Sew DIY Wooden Snowflake Holiday Decor

I love using the Cricut Easy Press 2 when ironing on the wood as I can select the perfect temperature and time!  Click here to access the online Cricut Interactive Guide to determine the perfect temperature and time to apply your iron on.  


Farmhouse Christmas Canning Jar - vinyl

Farmhouse Christmas Canning DIY Holiday Gift

The "Farmhouse Christmas" vinyl cut file is free with Cricut Design Space Access Account.  The white vinyl is striking against this homemade canned jar of salsa.  Talk about the perfect holiday gift to crack open and smell garden grown tomatoes!  The canning jar buffalo plaid fabric accents the charm perfectly.  You can cut out all your fabric circles on a Cricut Maker with the Rotary Cutting Blade.  

Farmhouse Christmas Canning DIY Holiday Gift

Compare the two photos above!  The white vinyl just pops the charm on this DIY Handmade Holiday Gift.  I cut the white vinyl and used clear transfer tape to apply the vinyl on the glass jar.  

Tree Ball Jar Sipping Cup - vinyl

Christmas Tree Holiday Ball Jar Straw Mug

Apply green Christmas Tree vinyl on a clear ball jar with a striped straw for some extra holiday fun!  

Fabric Gift Baskets - fabric sewing

Cricut Maker Simplicity Fabric Basket Handmade Holiday gift

Did you know Cricut Design Space has preloaded Simplicity sewing patterns?  The complete instructions for the pattern are loaded for you to access digitally or print off for convenience.  These fabric baskets are made by cutting out rectangular squares of fabric and medium weight stabilizer on the Cricut Maker with your rotary blade. 

Holly Jolly Fabric Holiday Basket Grommets

After stitching these together, it felt awesome to add the black metal grommets with a little bit of hammering.  The beauty of these fabric baskets is that you use the metal grommets to fold the baskets outwards to make a larger box or inwards for a smaller box.  Happy boxing baskets!

Farmhouse Holiday Tee Towels - iron on

Cricut Tee Towels Pine Cone Black Trucks and Fabric

I love the variety of tee towels you can find nowadays!  It is as slick as can be to cut out with gold an iron on pine cone element for a holiday accent.  The pinecone is available for free in the Cricut Design Space Access Account.  

Cricut Tee Towels with Black Truck Iron On

The pick up truck silhouette is available in Cricut Community to access here!  I drove them in a row and applied them on the tee towel with the Cricut Easy Press 2 using the perfect time and temperature settings.  

Cricut Tee Towels with Printed Iron On Winter Green

Printed Iron On sheets are fun to use for DIY Handmade Holiday Gifts!  I love the variety of printed iron on materials available at my local craft store on online purchase.  

Cricut Gold Foil Pine Cone on Buffalo Plaid Tee Towel Cricut Easy Press 2

Using the Cricut Easy Press Interactive Quick Reference Guide online,  I ironed on the Gold Pine Cone at 340 degrees for 30 seconds in the cricut Easy Press Mat.  It felt like precision with a polished finished gift!  


Holly Jolly Classic Mugs - vinyl

Cricut Maker Holly Jolly Vinyl Mugs Completed

There is nothing as classy as some Holly Jolly goodness on these dollar store mugs.  The simple black and white is very trendy

Cricut Maker Holly and Jolly Mugs to apply vinyl

Cut out the vinyl on your Cricut and apply with ease to your mugs using transfer tape!

Farmhouse Sew Wooden Signage - iron on knife blade wood

Sewing Machine Wooden Sign Buffalo Plaid

The Cricut Design Space Community file is available here!  I LOVE the combination of materials here with the wood and metal.  The buffalo plaid printed iron on rocks this sign!  

Sewing Machine Wooden Cricut Maker Sign

Cutting out the wooden sewing machine using your Knife Blade with the Cricut Maker is phenomenal!  I used the same digital file to cut out the iron on!  

Cricut Maker cutting wood and Buffalo Plaid Iron On Face Down on Mat

Embroidery Hoop Decor - iron on project

Embroidery Hoop DIY Handmade Truck Holiday Gift

Embroidery Hoop Decor is all the rage now!  Red plaid Buffalo fabric makes this project sing with your favorite images to cut out!  But imagine the possibilities of all sizes for wall decor to Christmas tree ornaments!  

Holiday Quilted Throw Pillow - Sewing Fabric

Holiday Pillow with Handmade Red PomPoms

A quilted holiday pillow is lots of fun with the Christmas fabrics from Stitches Quilting!  Simple is classy and clean with 16 - 5 inch squares sewn together.  The red quilted stitching a half inch from the seams makes all the difference with this snuggly pillow.  Want to make handmade pom poms that fit perfectly for your project?  Be sure to sign up for the Stitches Quilting newsletter to get our next published post with all the details.  

Learn how to make this Quilted Tribal Holiday Throw HERE!  

Please share ideas for more Handmade DIY Holiday gifts below!  Tag me in your Facebook, Instagram or Twitter posts so I can see what you are making.  You inspire me!  

Join our Cricut Maker Quilt & Sew Facebook Group and follow us on Facebook, Instagram and YouTube to follow live instructional videos on these projects with giveaways too!

Download Your Curved Soup Bowl Hotpad Cozy Pattern PDF

Enjoy a 9 page pdf pattern download with step by step instructions for the Curved Soup Bowl Hotpad Pattern


Cricut Maker Machine

Happy Holiday Sewing!


Deanna Wall Stitches Quilting Stitching Through Life

Deanna Wall Stitches Quilting

This is a sponsored conversation written by me on behalf of Cricut. The opinions and text are all sincerely mine.


DIY Sewing Quilting HANDMADE HOLIDAY GIFT TUTORIALS Hot Pads, with Buffalo Plaid, Vintage Trucks, Vinyl, Iron On, Wood, Metal & Fabric Combined, Fabric Baskets

Posted on

Cricut Maker vs. Air Explore 2

Cricut Maker vs. Air Explore 2 Which Machine is Right for You?

Cricut Maker vs. Air Explore 2

Which machine is right for YOU? – Cricut Maker vs. Air Explore 2

A Cricut Machine opens up a world of possibilities!  The projects I daydream about, I’m able to create with a polished look by using Cricut!  So which machine is right for you?  It depends on what you want to create and most importantly what you think you will create in the future.  

Cricut MAKER vs AIR EXPLORE 2 Which Machine for YOU


Think of the Cricut Maker like an iPhone

Think of the Cricut Maker like an iPhone

Your smart or iPhone updates the firmware and apps all the time!  The Cricut Maker is built with few buttons so the machine is updated constantly along with the Design Space Software App.  

Digital vs. Dial Pressure Settings

Don’t limit yourself to the Dial Pressure Settings jump into digital pressure setting for an unlimited amount of materials.  


Adaptive Tool System 


With the brass gear in the Cricut Maker the cutting tool is able to turn and pivot while lifting up.  Instead of dragging cuts, now the cut are precise!  Cricut is able to update the machine with new adaptive tools and abilities.  

Cricut Adaptive Tools


Cricut Adaptive Tools explained Rotary Blade Knife Blade and Scoring Wheel


Adaptive tools that are available include the Rotary Blade, Knife Blade and Scoring Wheel.  

Sewing & Quilting Patterns

Cricut Sewing & Quilting Patterns

There are 100’s of sewing and quilting patterns available in Cricut Design Space.  What is even better that you can upload your own patterns too!

Cutting Fabric 

Cricut Maker Cutting Fabric

I have personally cut a huge amount of fabric types with my Cricut Maker!  I can attest to its abilities and accuracy!

Cricut MAKER vs AIR EXPLORE 2 Which Machine for YOU?

Some items that I have made with my Cricut Maker!  

Things You Can Make with a Cricut Maker


Deanna Wall Stitches Quilting Stitching Through LifeDeanna Wall Stitches QuiltingStitches Quilting Online Neighborhood Store

This is a sponsored conversation written by me on behalf of Cricut. The opinions and text are all mine.


Posted on

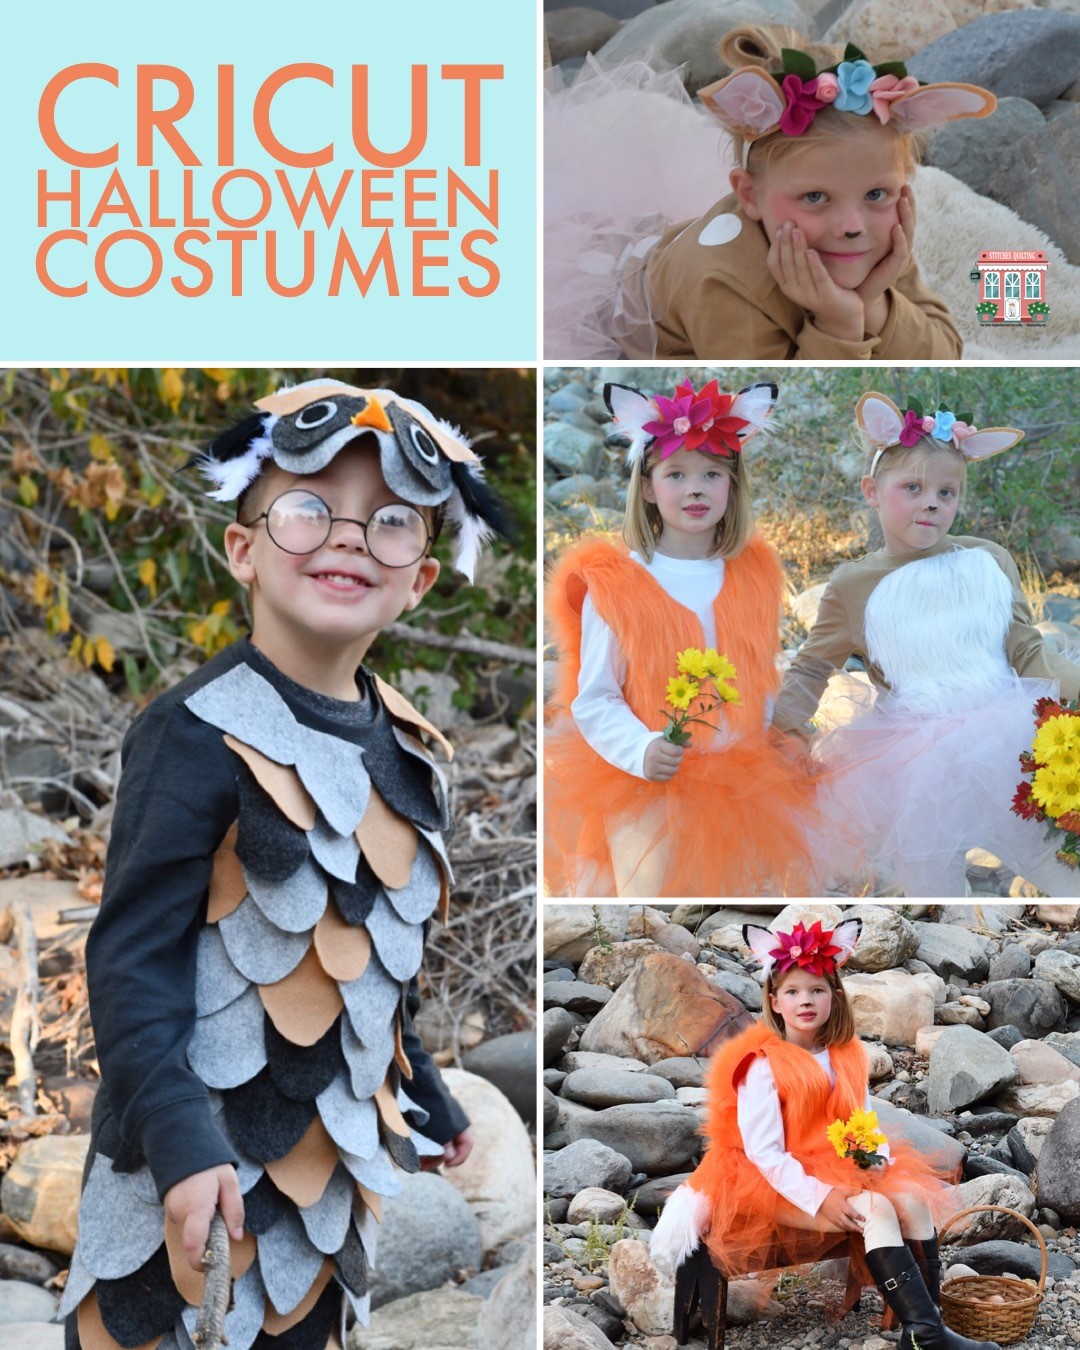
DIY Woodland Fox Fawn Owl Costume with Cricut

EASY! All you need is some felt & a glue gun! DIY Cricut Halloween Costumes Hack

DIY Woodland Fox Fawn Owl Costume with Cricut

Easily create your own DIY Woodland Fox, Fawn or Owl Costume with Cricut!  These costumes went together so quickly and inexpensively too!

Easy Quick DIY Fawn Costume Pottery Barn Hack

This Fawn DIY Easy Woodland Costume is going to create a smile on your littles face!  Can you notice the iron on white spots on the Fawn’s back?

Our Fox is just enchanting with the stuffed fur tail, toile skirt and fur vest.  All fabric purchased at Joann Fabric Store!

Felt colorful flowers accented by white fur make this headpiece endearing.

Our Owl looks wise and curious!  This DIY Owl Woodland costume has the perfect amount of expression without overbearing the personality of your little!

DIY HACK Owl Costume Supplies Needed for Cricut Maker

Supplies Needed for the Owl costume as we made it include everything pictured above and a head band from Joann Fabric Store to hot glue.

These Woodland Costumes were made with the Cricut Maker web

Using the Cricut Maker with the new rotary cutting blade makes cutting out these Acrylic Felt Fabrics for DIY costumes a breeze!

Building Owl Woodland Costume by hot gluing Cricut cut felt feathers to a long sleeved shirt

Start out first by purchasing some long sleeved shirts to build your desired costume on.  The Woodland Owl costume we purchased a matching sweatpant with the long sleeved shirt.  The Fawn costume used a tan long sleeved shirt and the Fox costume used a white long sleeved shirt.  After cutting out the Owl Feathers on the Cricut Maker you then hot glue the accents to the shirts, these costumes come together quickly!

Owl Costume Cricut Community DIY Instructions & SVG Files to Make

Get cutting right away on the Owl DIY Costume with all the Cut files in the Cricut Community click here.

Fawn Costume Cricut Community DIY Instructions & SVG Files to Make

Jump over to the Cricut Community to have access to cut everything you need to make the DIY Fawn Deer Costume with the Cricut Maker click here!

Fox Costume Cricut Community DIY Instructions & SVG Files to Make

Interested in your little being the enchanting Fox costume then click here to visit the Cricut Community because I have shared all of my cut files with you!  Please share what you make by using the #stitchesquilting hashtag on Instagram or tag me with @stitchesquilting on Facebook or Instagram.

DIY Hack Fawn Costume Supplies Needed

The Fawn Costume supplies needed are in the picture above!

Assemble the Fawn Headband web

Use a hot glue gun to assemble the Fawn Headband.

DIY Hack Fawn Headband Costume Cricut

Our Fawn Woodland Animal Headband finished up like the image above.  BAM – the power of the Cricut Maker!  Remember you can cut all these files out for yourself by following the link above!

How to Make a DIY Fox Costume Headband

The Fox and Fawn Ear are wrapped around the back of the headband underneath to be hot glued on.

DIY Hack Fox Headband Cricut

Fox Headband completed and embellished!

DIY Hack Fox Costume Supplies Needed from Joann Fabric

Fox Tail supplies needed and can be purchased at Joann Fabric Store

Sewing the Furry Fox Tail DIY Cricut Costume web

Sew the orange fur and white fur together to make the fox tail.  We brushed ours after stitching the fur to pull the fur out of the seam.

DIY Hack Fox Costume Halloween

The Fox costume looks like above when completed.

DIY Hack Fox Costume Furry Tail

Fox Tail completed and stuffed!

DIY EASY Fox Costume to Cut with the Cricut web

The Fox costume is just dreamy!

Close up of the Fawn headband, but remember you can customize yours to be any color or type of flower the cut file has options for you!

Woodland Fox and Fawn Costumes DIY Cricut Easy web

The Fox and Fawn costumes are just lovely!

DIY Cricut Owl Costume Wise Book Reading 5469 web

Gotta love our wise little Owl getting ready to read!

Deanna Wall Stitches Quilting Stitching Through LifeDeanna Wall Stitches QuiltingStitches Quilting Online Neighborhood Quilt Store & Blog

This is a sponsored conversation written by me on behalf of Cricut. The opinions and text are all mine.


Posted on

Sew Together & Finish Your Cricut Riley Blake Quilt Kit

Steps & Tips to Finish Any Quilt featuring the Cricut Riley Blake Quilt Kit Example

Sew Together & Finish Your Cricut Riley Blake Quilt Kit

Sew Together & Finish Your Cricut Riley Blake Quilt Kit!  Trying to support you in having no UFO’s (Unfinished Projects)!  I really want to give you all the tools to complete your quilt!

Getting Cozy with a Tribal Throw Christmas Quilt web

This Tribal Throw Quilt is so COZY that I made myself some hot cocoa and lite the fireplace!  It was so cozy that my Cavalier Spaniel, Lady, had to come snuggle too!

Here is the video all about finishing the Tribal Throw from Facebook! I’m sorry it went a bit fuzzy, as I was streaming live to Facebook, Instagram and YouTube. I will need to re-shoot this video…

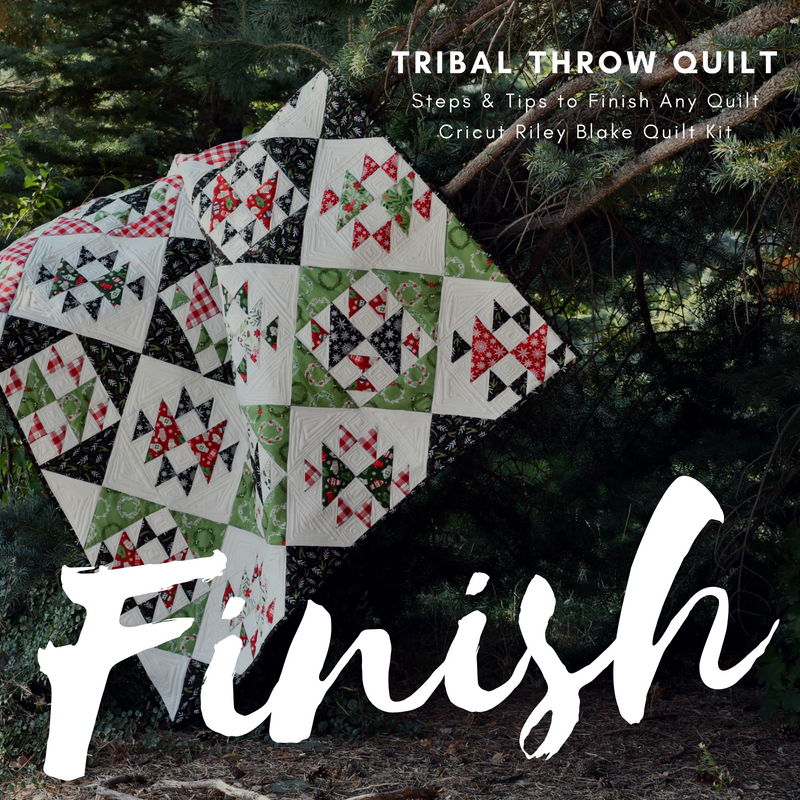
Here is a photo of the finished Tribal Throw Quilt with the long arm quilting I did.  Check out the original version, because I had plenty of fabric from the kit to make more blocks and eliminate the borders.  The black binding is hard to see in this image.   Don’t you think the Pine trees close to my home was the perfect place to snap a picture of the finished quilt?  Click the image or link below to view the Tribal Throw Quilt Pattern in Cricut’s Design Space.  

Let’s break down the different aspects of making/finishing the Tribal Throw Quilt.

Cricut Maker Tribal Throw Quilt Finished web

Check out all the extra fabric that was left over from the Cricut Riley Blake Quilt Kit.  You can count on me making more holiday projects with this left over fabric.  If the Cricut Comfort & Joy Quilt Kits are all sold out, I will buy additional bolts that you can purchase some by the yard for future holiday projects.  I’m think of hot pads, table runners, stockings and MORE!  I’m ready to make lots of holiday gifts this year.  Hmmmm… Do you have any ideas of things to make?  Click the image or link below to view the Comfort & Joy Quilt Kits on Cricut’s website.

Check out all the extra fabric from the Cricut Quilt Kit
Riley Blake® Comfort and Joy Throw Size Quilt Kit

First of all everyone is asking where they can find the pattern for the Tribal Throw Quilt.  You can find the Tribal Throw Quilt in Cricut’s Design Space.  Cricut Design Space is kind of like Pinterest where you can see all the things you can make with a Cricut Maker or Cricut Explore.  You can visit Cricut’s Design Space by downloading the APP on a Smart Phone or iPad.  OR you can browse Cricut’s Design Space on you laptop or desktop computer.

How to select your thread and quilt backing to finish your quilt

After your quilt top is sewn together, it is important to think about how you want to quilt your quilt.  You can watch more of my live videos to see me explaining the process.  You guys actually helped me decide!  Someone on live video suggested I quilt all of the white spaces in the quilt so the “tribal” quilt block pattern would really shine.  I love to use a light cucumber shade of green sometimes when stitching on top of white fabric.  If you lay a single thread from the cone on the white fabric you will see it blend and disappear.  I might have preferred a dark green background but with long arm quilting the top thread and bobbin thread need to be the same color.  Subsequently, I selected the lighter background of fabric for my backing knowing that I wanted to quilt the white spaces with a lighter thread.  How do you select your threads and backings?  In this picture you can notice the black binding.  I just love the black binding framing the Tribal quilt with no borders.

Love the Tribal Quilt with no borders

I couldn’t resist making more Tribal Quilt Blocks with the accenting hour glass quilt blocks.  I eliminated the borders but can you notice the shift in colors in the Hour Glass Blocks from deep red, to black and green.  I love that this quilt is more than what the eye initially beholds.  What do you see?

Perfectly Cut Triangles Cut out on the Cricut Maker

I will add a download that will summarize tips and tricks sewing together triangles in quilt blocks!  Stay posted or sign up for the newsletter!  Coming very very soon!  I just LOVE how the Cricut Maker cuts all these triangles out so perfectly!  Each quilt block in the Tribal Quilt is 7.5 inches finished.

Shop new arrivals from Cricut!

There have been LOTS of questions about how much items are and where you can purchase them.  Visit Cricut’s website and you can browse all their amazing products…  Yes, I’m a Quilter, but also a gadget girl and love how intuitive Cricut is with everything they make!  Cricut’s engineers and product managers just keep thinking of incredible things to make for us!  I know most of them as I have taught around the country for Cricut.

Christmas in July

The Cricut Tribal Quilt has been a three part series.  Click the images below to review Part One and Part Two of the Tribal Quilt Series!

How to Cut Quilt Fabric with the Cricut Maker 4

How to Use the Cricut Maker to Cut a Riley Blake Quilt Kit

Be sure to join the Everyone Can Quilt Facebook Group or on Instagram tag me @StitchesQuilting or use the #stitchesquilting so I can see everything you are making!  I love the quilty community as we all come together and share!  Can’t wait to see what you create!  Let’s follow each other!  You can turn on notification to my social media so when I go live you will be notified.

If you are interested in using the Cricut Maker to Quilt or Sew, then join my friendly Facebook Group!  Let’s have fun “Stitching Together”!

Lets Have Fun Stitching Together

Ask any questions or thoughts you may have share below, I’ll be right back to answer them!

Deanna Wall Stitches Quilting Stitching Through LifeDeanna Wall Stitches QuiltingStitches Quilting Online Neighborhood Quilt Store & Blog


This is a sponsored conversation written by me on behalf of Cricut. The opinions and text are all mine.

Posted on 1 Comment

How to Plan a Riley Blake Quilt Kit with the Cricut Maker

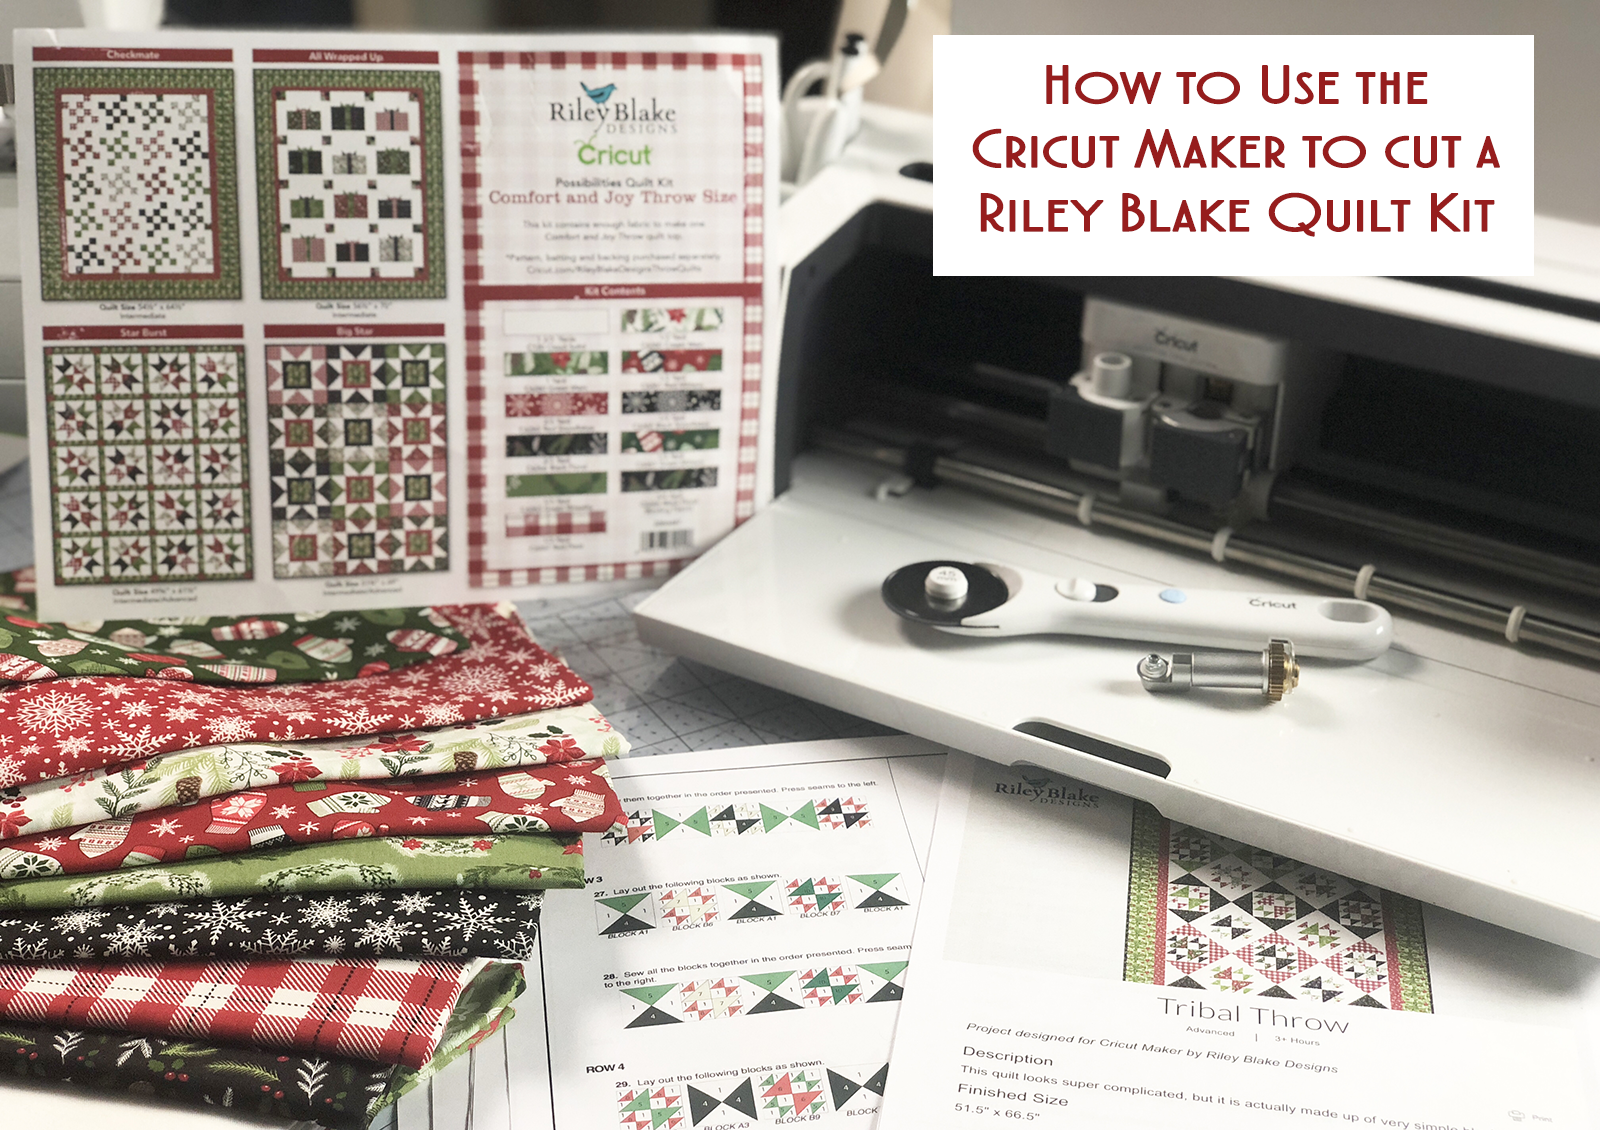
How to Use the Cricut Maker to Cut a Riley Blake Quilt Kit

How to Plan a Riley Blake Quilt Kit with the Cricut Maker

Cricut Maker Possibilities Quilt Kit with Riley Blake Designs Comfort and Joy Fabric is a quilting treat together!  Have you seen a quilt kit that can become one of four quilts?

Cricut Riley Blake Possibilities Quilt Kit Comfort & Joy

Which quilt would you make with the Comfort & Joy fabric?  Checkmate Quilt? All Wrapped Up Quilt?  Star Burst Quilt?  or Big Star Quilt?    To see this quilt kit for sale in the Cricut Online Store click here.  

Cricut Riley Blake Possibilities Quilt Kit Comfort & Joy Tribal Throw Quilt

But wait….  There is more… in Cricut Design Space there is a Tribal Quilt that also works with the Possibilities Quilt Kit!   I’ll make the Tribal Quilt for some Christmas scrappy fun to cozy up in.   I feel like it’s been awhile since I have made a scrappy quilt!  I can’t wait to sip some hot cocoa wrapped in this Holiday Tribal Quilt!

Cricut Riley Blake Tribal Quilt

Can you notice the tonal color gradient in the quilt layout with the row of lime green, dark green and red plaid?  I love the play of color patterning in the quilt!  Click here to view all quilts already available in Cricut Design Space.

Cricut Design Space for Quilting on your iPhone iPad and Laptop

Download the FREE Cricut Design Space app on your iPhone or Mobile Smart Phone, iPad to view the various quilt pattern already loaded into Design Space.   Log into Cricut Design Space on your desktop or laptop computer too. Browse through Cricut Design Space and “favorite”  the quilts and sewing projects you want to create by taping the yellow star.

Cricut Design Space Favorite Quilts

Up above you will see the drop down menu of “My Favorites” which helped me decide to make the Tribal Throw with the Riley Blake Comfort and Joy Possibilities Quilt Kit.  If you are a quilter you will love seeing all the quilts and sewing projects too!  I feel like it’s Cricut married to Pinterest while I favorite all the items I daydream to make!  To view your favorites in Design Space, toggle ge your category to “My Favorites”.

Cricut Design Space Tribal Throw Quilt

When you are in Cricut Design Space, this is what Tribal Throw Quilt pattern will look like.  Remember you can make this quilt with your own fabric or purchase the Cricut Comfort & Joy Possibilities Quilt Kit.  The Quilt Kit does not include the cost of the pattern, but last time I looked the quilt kit in the Cricut Online Store is $39.99 and half off!  Bargain!

Cricut Design Space Tribal Throw Instruction View

When using quilt patterns in Cricut Design Space, you can just digitally save the actual pattern instructions or print them off for handy convenience.

Cricut Quilting and Sewing Supplies with Riley Blake Quilt Kit

If you are new to quilting, Cricut can very affordably help you get set up with all the quilting supplies you need.  I’m excited about using some of their newly developed quilting and sewing products.   The new Cricut Rotary Cutting self healing mat, Rotary Blade and Ruler are excellent quality.   They all come very handy in the Cricut Rotary Cutting Kit!  The 12 x 24 inch sized Cricut Ruler is total awesome sauce to have full control when prepping fabric for your Cricut FabricGrip Mats!

Cricut FABRIC Scissors from the Sewing Tool Kit

Get decked out with the Cricut Sewing Tool Kit too.  The Cricut Fabric Scissors actually say “Fabric” on them so everyone in your family will know those scissors are YOURS!

Cricut Sewing Kit Fabric Scissors


Next weeks post will be all about cutting the Riley Blake 100% Quilting Cotton Fabric out on the Cricut Maker!  Should this quilt be a holiday gift or a special quilt for me?  Oh the possibilities!

How to Cut Quilt Fabric with the Cricut Maker
Click HERE to learn how to cut your quilting fabric on the Cricut Maker!

Deanna Wall Stitches Quilting Stitching Through LifeDeanna Wall Stitches QuiltingStitches Quilting Online Neighborhood Quilt Store & Blog


This is a sponsored conversation written by me on behalf of Cricut. The opinions and text are sincerely & authentically all mine.

Posted on

Bunting Banner Tutorial with the Cricut Maker

Bunting Banner Tutorial with the Cricut Maker

This holiday bunting banner tutorial is simple to make, cut by hand or with a Cricut machine!  Free pattern and tutorial available with SVG cutting files.

Here is what this Valentine Bunting Banner looks like when in Cricut’s Design Space ready to cut on the Cricut.  I used the Cricut Maker to cut the fabric used in this Valentine Bunting Banner.  Below is listed all of the supplies that I used and where they are available for sale in Stitches Quilting online store.  Remember Cricut’s Design Space is free to use on your computer or as an APP on your portable handheld devices.  Make a free Cricut account at www.cricut.com and click on the upper right hand corner to access Cricut Design Space.

Valentine Love Bunting Banner Cricut Design Space LinkClick here for a direct link to Cricut Design Space LOVE Valentine Bunting Banner Cricut SVG file. All images in the cut designs are free except the font used is from a Cricut Access Membership.  If you plan to cut the bunting out by hand with scissors or a rotary cutter download the full instructions and cut files here.

Cut the Riley Blake Lost and Found Fabric in 12 inch strips or 12 inch square to get the fabric ready to place on the Cricut FabricGrip Cutting Mat.  The sample was made with 3 different fabrics; of course you can customize your bunting to be any color combination!   The letters were cut with Osnaberg Roclon Natural Fabric that has a bit of texture.  Of course you could cut this entire project out of any substrate even felt or paper!  Let your imagination crawl with the possibilities.  What ideas do you have?

Riley Blake Bunting Fabric to cut with Cricut Maker


After cutting the fabric on the Cricut Maker the six bunting pieces will look like this.  Examine the clean precise cuts!

Valentine Fabric Bunting Pieces Cut Out


Cut 7.5 inch length of 3.5 inch wide Jute Webbing for each bunting needed on your banner.  The Valentine Love Bunting Banner above needs six 7.5 inch strips cut.  After cutting the strips to length mirror the triangular cut on the fabric so it is consistent with the Jute Webbing.

Cut the webbing with Valentine bunting fabric

Valentine Bunting Jute Webbing Strips

Iron on the L-O-V-E letters and heart to the fabric with the Cricut Easy Press. Of course you can use any word expression other than “love” for your Valentine Bunting.  Personalize it and make it yours.

Cricut EasyPress with Valentine Bunting


Layer the fabric bunt over the 3.5 inch jute webbing and secure with stitching or hot glue.  I actually sewed the fabric to the top of the jute webbing.

Cricut Maker Sew Valentine Bunting Banner

To assemble the bunting, I used 2 yards of a wired fabric ribbon. Find the center point of the ribbon and start arranging each bunting 2 inches apart. The bunting could be sewn to the ribbon or hot glued. This could be a sewing or no sew project of course!


Bunting Banner Supplies Needed:

2 yards of ribbon

3.5 inch Jute Webbing1.5 yards – 3.5 inch Red Jute Webbing at Stitches Quilting Online Store


Lost and Found Red Polka Riley Blake FabricLost and Found Red Circles Riley Blake Fabricsparkle lost found red damaskHalf a yard each – Riley Blake My Minds Eye Lost and Fabric Fabric at Stitches Quilting Online Store


 Half a yard – Roclon Osnaberg Natural Fabric at Stitches Quilting Online Store


Please share what you have made with this Fabric Bunting Tutorial in our Cricut Maker Quilt and Sew Facebook Group.  If you are not already a member, its is completely FREE.  We would love to have you join us!  Let’s inspire each other and create together.   Comment below with ideas or questions you might have, we are here to help.

To make sure you don’t miss out on any other tutorials, be sure to subscribe to the Stitches Quilting Newsletter and let’s get social on Facebook or Instagram! Can’t wait to see you soon!

Wishing you lots of love!  XOXO, Deanna

Deanna Wall Stitches Quilting Stitching Through Life

This is a sponsored conversation written by me on behalf of Cricut. The opinions and text are all genuinely mine.


 f

Posted on

Cricut Maker Quilt Sew Many Squares

Cricut Maker Sew Many Squares Quilt Amy Butler Free Spirit Fabric

Cricut Maker Quilt Sew Many Squares

Cricut Maker Quilt Sew Many Squares – Can’t wait to cozy up with this quilt cut with the Cricut Maker using the Rotary Blade and Fabric Grip Mat.

Cricut Maker Finished Quilt with Quilting

Buy Now at Stitches Quilting

Sew Many Square Quilt Kit with Amy Butler of Free Spirit Fabrics for the Cricut MakerCricut Maker Cutting Fabric

Cut fabric with the Cricut Maker is like cutting butter!  Yum!  Can’t wait to play!

Cricut Maker Cutting Fabric

The Sew Many Squares Throw Quilt is a Free Cricut Maker Project.

Cricut-Maker-Sew-Many-Squares-QuiltCricut-Maker-Sew-Many-Squares-QuiltCricut-Maker-Sew-Many-Squares-Quilt

Each Cricut Maker Project Outlines all of the materials that you need.  Materials list along with complete instructions can be printed off or always accessible on your mobile or computer through Design Space.  You never have to forget your list when you get to the store.

Cricut-Maker-Design-Space-Quilt

Here is a peek at the Sew Many Squares Throw Quilt Instructions.  All Cricut Maker Sewing Projects have instructions similar to this.

Cricut-Maker-Sew-Many-Squares-Quilt-Instructions

Let’s start by cutting the fabric on the Cricut Maker!  I always put the pretty side down on the fabric mat but had to showcase the fabric facing up for a quick photo!

Cricut Maker Cutting Fabric

This is what the Cricut Design Space screen prompts look like when you cut fabric.

Cricut-Maker-Quilt-Ready-to-Cut

The Four Patch squares are being string pieced on the sewing machine with the digital instructions in the background.

Cricut Maker Instructions with Quilt Blocks Sewn

Now ready to piece the four squares together!

Cricut Maker Ready to Sew Quilt Blocks

The four square blocks are coming together nicely!

Sew Many Squares Quilt Cricut Maker 4 Square Block

The beautiful Amy Butler Eternal Sunshine large squares cut out by the Cricut Maker are labeled and laid out to stitch to the four square quilt blocks.

Sew Many Squares Quilt Blocks cut with Cricut Maker

The Sew Many Squares Quilt is ready to be snuggled…  Stitches Quilting Fabric Kits available for this quilt with Amy Butler Eternal Sunshine collection by Freespirit Fabrics.

Cricut Maker Sew Many Squares Quilt Amy Butler Free Spirit Fabric

Buy Now at Stitches Quilting

Sew Many Square Quilt Kit with Amy Butler of Free Spirit Fabrics for the Cricut MakerCricut Maker Cutting Fabric


Any questions you have about cutting fabric with the Cricut Maker? 

This is a sponsored conversation written by me on behalf of Cricut. The opinions and thoughts are all genuinely mine.