Posted on

DIY Handmade Holiday Gifts Tutorial

Make your own DIY HANDMADE HOLIDAY GIFT TUTORIALS for friends and family

DIY Handmade Holiday Gifts Tutorial

Making Handmade Holiday Gifts makes me excited for Holidays!  Creating Holiday gifts with the Cricut Maker just gives a professional look and cut!  

Soup Bowl Cozy – fabric sewing

Cricut Maker Buffalo Plaid Rounded Soup Cozies (2)

Curved edges on the quilted cozy soup bowls softens their look.   They are so handy to make a set and stack on top of each other.  

Cricut Maker Buffalo Plaid Rounded Soup CoziesFor the free Curved Soup Bowl Cozies subscribe below!  Nest together and stitch on the blue line!  


Download Your Curved Soup Bowl Hotpad Cozy Pattern PDF

Enjoy a 9 page pdf pattern download with step by step instructions for the Curved Soup Bowl Hotpad Pattern


Materials needed:  2 - 10 inch fabric squares AND 2 - 10 inch pieces of batting.  {Use all cotton materials for a microwave safe version.  Increase insulation by adding a layer of Pellon Insul-fleece available in the Stitches Quilting online store! )

Soup Bowl Cozy Hot Pad Materials needed 2 -10 inch square of fabric and batting


Or.... have the Cricut Maker in Cricut cut out exact dimensions for you from this FREE Cricut Community file!  hmmmmm... so many possibilities. 

Soup Bowl Cricut Rounded Cozy Hot Pad


Especially fun for making a bunch of these soup bowl cosies as a DIY handmade holiday gift for neighbors, friends or family!  

If you don't cut out your soup fabric bowls on the Cricut Maker then use this handy guide from a 10 inch squares of fabric!  

  1.  Stitch an "X" on each 10 inch fabric square with a piece of batting behind it.Soup Bowl Hot Pad Cozy Stitch an X from point to point
  2. After stitching your "X" fold your fabric square in half.  Using a ruler, mark two dots 1 inch from the fold and 2 inches from the top of the batting side.  Draw a line meeting the two dots. Soup Bowl Hot Pad Cozy Tapered Markings
  3. Repeat this step on all four sides of your fabric squares.   This will be a stitching line to taper your bowl.  Remember one inch from the fold and two inches from the top.  
  4. Stitch on the diagonal lines you drew on the batting side.  
  5. Trim the excess fabric.
  6. Curve your square corners with a bowl to mark your stitching line.   Use a bowl to trace the edges of your quilted 10 inch squares or download your pattern here!Soup Bowl Rounded Hot Pad Cozy Instructions
  7. Nest your tapered bowls together with right sides together.  
  8. Stitch on your blue curved lines with right sides together on the straight edge of the curve.Soup Bowl Rounded Hot Pad Stitch Line
  9. Leave a two inch opening on the "straightest" edge of the curve.
  10. Trim the excess fabric from the blue stitching line.  
  11. Turn inside out through the opening.
  12. Top stitch the opening closed then all the way around the top of the Hot Pad Soup Bowl Cozy
  13. Enjoy your Rounded Soup Bowl Cozy Hot Pad with some hot soup or gift this awesome Handmade Soup Bowl Cozy!

CLICK HERE FOR THE COMPLETE Soup Bowl Hot Pad Cozy Tutorial!  


Ruffled Buffalo Plaid Hot Pad Hand Mitt -  Cricut Simplicity Sewing Pattern 

Cricut Maker Buffalo Plaid Ruffled Hot Pad Handmade Gift Standing Up

Love the trendy ruffled edge for the wrist on this Handmade DIY Buffalo Plaid Hot Pad Gift.  

Cricut Maker Buffalo Plaid Ruffled Hot Pad Handmade Holiday Gift with cookies

Check out the Simplicity Hot Pad Pattern available in Cricut Design Space.  

Cricut Maker Buffalo Plaid Ruffled Hot Pad Fabric Cut

Buffalo Plaid Fabric can be purchased from Stitches Quilting online fabric store CLICK HERE.  

Red and Black Plaid Fabrics

EASY Square Hotpads Layered - fabric sewing

Cricut Maker Buffalo Plaid Handmade Gift

Materials Needed:  Easy to make square hot pad made from 6 - 10 inch square pieces of fabric and 2 - 10 inch square pieces of batting. 

Cricut Maker Buffalo Plaid Hot Pads Supplies Needed for Holiday Gifts

  1.  Can you see the order of the fabrics laid out?  Start with a white or muslin square that will not be seen.  Stack your batting 10 inch layer and add a Pellon Insul-fleece Layer for heat resistance if you would like.  Layer with a red square of  buffalo plaid fabric and then layer 4 Folded in half 10 inch squares overlapping staggered on top with the raw edges facing outwards.  

Handmade Holiday EASY Layered Hot Pad

2. Let's review the top layer.  Fold four 10 inch squares into a rectangle.

Handmade Holiday EASY Layered Hot Pad

3.  Match the two red buffalo folded 10 inch fabric squares side to side with folded edges matching each other in the center and raw edges to the outside.  

Handmade Holiday EASY Layered Hot Pad

4.  Overlap, weave and stagger the two black and white folded 10 inch fabric squares through the red buffalo squares in a pattern like closing a cardboard box.  

5.  Stack all your layers in order and stitch around all four sides of the Hot Pad. 

Handmade Holiday EASY Layered Quilted Hot Pad

6.  Peek through your four weaved top layers to turn inside out!  Voila and no need to close!  


Let Us Sew Wooden Snowflake  - Cricut Iron On & Wood Cutting

Let Us Sew DIY Wooden Snowflake Holiday Decor


Check out your local dollar store for raw wooden items to paint.  This wooden snowflake is easy to cut out with your Cricut Maker and the knife blade.  Quickly access this Cricut black iron-on cut file for free in the Cricut Community Design Space!  I love using iron-on with my wood projects!  It looks seamless and beyond professional!  Wouldn't a "sewy or quilty" friend love this snowflake? 

Let Us Sew DIY Wooden Snowflake Holiday Decor

I love using the Cricut Easy Press 2 when ironing on the wood as I can select the perfect temperature and time!  Click here to access the online Cricut Interactive Guide to determine the perfect temperature and time to apply your iron on.  


Farmhouse Christmas Canning Jar - vinyl

Farmhouse Christmas Canning DIY Holiday Gift

The "Farmhouse Christmas" vinyl cut file is free with Cricut Design Space Access Account.  The white vinyl is striking against this homemade canned jar of salsa.  Talk about the perfect holiday gift to crack open and smell garden grown tomatoes!  The canning jar buffalo plaid fabric accents the charm perfectly.  You can cut out all your fabric circles on a Cricut Maker with the Rotary Cutting Blade.  

Farmhouse Christmas Canning DIY Holiday Gift

Compare the two photos above!  The white vinyl just pops the charm on this DIY Handmade Holiday Gift.  I cut the white vinyl and used clear transfer tape to apply the vinyl on the glass jar.  

Tree Ball Jar Sipping Cup - vinyl

Christmas Tree Holiday Ball Jar Straw Mug

Apply green Christmas Tree vinyl on a clear ball jar with a striped straw for some extra holiday fun!  

Fabric Gift Baskets - fabric sewing

Cricut Maker Simplicity Fabric Basket Handmade Holiday gift

Did you know Cricut Design Space has preloaded Simplicity sewing patterns?  The complete instructions for the pattern are loaded for you to access digitally or print off for convenience.  These fabric baskets are made by cutting out rectangular squares of fabric and medium weight stabilizer on the Cricut Maker with your rotary blade. 

Holly Jolly Fabric Holiday Basket Grommets

After stitching these together, it felt awesome to add the black metal grommets with a little bit of hammering.  The beauty of these fabric baskets is that you use the metal grommets to fold the baskets outwards to make a larger box or inwards for a smaller box.  Happy boxing baskets!

Farmhouse Holiday Tee Towels - iron on

Cricut Tee Towels Pine Cone Black Trucks and Fabric

I love the variety of tee towels you can find nowadays!  It is as slick as can be to cut out with gold an iron on pine cone element for a holiday accent.  The pinecone is available for free in the Cricut Design Space Access Account.  

Cricut Tee Towels with Black Truck Iron On

The pick up truck silhouette is available in Cricut Community to access here!  I drove them in a row and applied them on the tee towel with the Cricut Easy Press 2 using the perfect time and temperature settings.  

Cricut Tee Towels with Printed Iron On Winter Green

Printed Iron On sheets are fun to use for DIY Handmade Holiday Gifts!  I love the variety of printed iron on materials available at my local craft store on online purchase.  

Cricut Gold Foil Pine Cone on Buffalo Plaid Tee Towel Cricut Easy Press 2

Using the Cricut Easy Press Interactive Quick Reference Guide online,  I ironed on the Gold Pine Cone at 340 degrees for 30 seconds in the cricut Easy Press Mat.  It felt like precision with a polished finished gift!  


Holly Jolly Classic Mugs - vinyl

Cricut Maker Holly Jolly Vinyl Mugs Completed

There is nothing as classy as some Holly Jolly goodness on these dollar store mugs.  The simple black and white is very trendy

Cricut Maker Holly and Jolly Mugs to apply vinyl

Cut out the vinyl on your Cricut and apply with ease to your mugs using transfer tape!

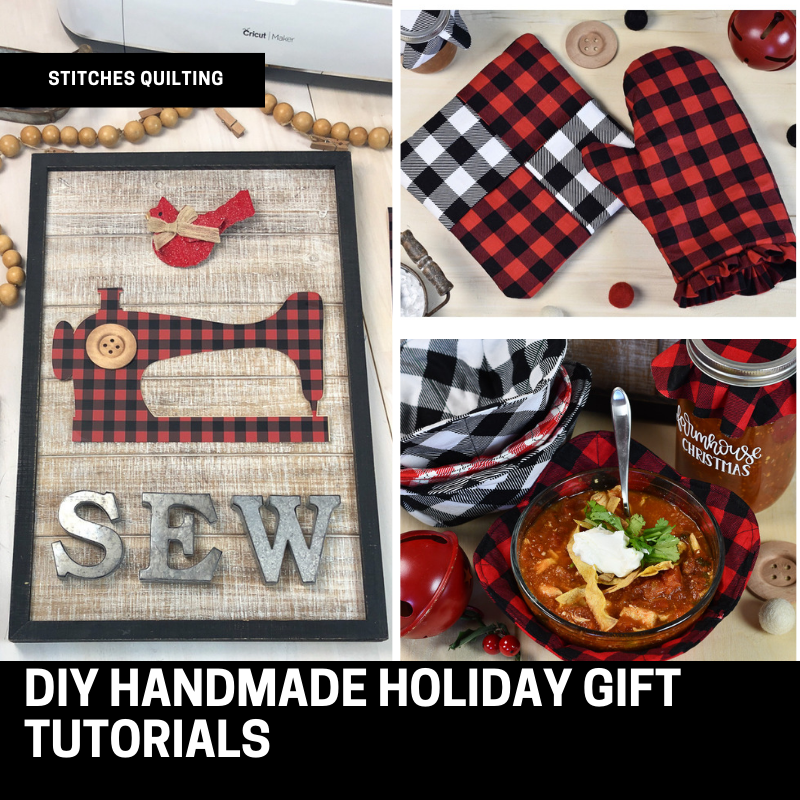
Farmhouse Sew Wooden Signage - iron on knife blade wood

Sewing Machine Wooden Sign Buffalo Plaid

The Cricut Design Space Community file is available here!  I LOVE the combination of materials here with the wood and metal.  The buffalo plaid printed iron on rocks this sign!  

Sewing Machine Wooden Cricut Maker Sign

Cutting out the wooden sewing machine using your Knife Blade with the Cricut Maker is phenomenal!  I used the same digital file to cut out the iron on!  

Cricut Maker cutting wood and Buffalo Plaid Iron On Face Down on Mat

Embroidery Hoop Decor - iron on project

Embroidery Hoop DIY Handmade Truck Holiday Gift

Embroidery Hoop Decor is all the rage now!  Red plaid Buffalo fabric makes this project sing with your favorite images to cut out!  But imagine the possibilities of all sizes for wall decor to Christmas tree ornaments!  

Holiday Quilted Throw Pillow - Sewing Fabric

Holiday Pillow with Handmade Red PomPoms

A quilted holiday pillow is lots of fun with the Christmas fabrics from Stitches Quilting!  Simple is classy and clean with 16 - 5 inch squares sewn together.  The red quilted stitching a half inch from the seams makes all the difference with this snuggly pillow.  Want to make handmade pom poms that fit perfectly for your project?  Be sure to sign up for the Stitches Quilting newsletter to get our next published post with all the details.  

Learn how to make this Quilted Tribal Holiday Throw HERE!  

Please share ideas for more Handmade DIY Holiday gifts below!  Tag me in your Facebook, Instagram or Twitter posts so I can see what you are making.  You inspire me!  

Join our Cricut Maker Quilt & Sew Facebook Group and follow us on Facebook, Instagram and YouTube to follow live instructional videos on these projects with giveaways too!

Download Your Curved Soup Bowl Hotpad Cozy Pattern PDF

Enjoy a 9 page pdf pattern download with step by step instructions for the Curved Soup Bowl Hotpad Pattern


Cricut Maker Machine

Happy Holiday Sewing!


Deanna Wall Stitches Quilting Stitching Through Life

Deanna Wall Stitches Quilting

This is a sponsored conversation written by me on behalf of Cricut. The opinions and text are all sincerely mine.


DIY Sewing Quilting HANDMADE HOLIDAY GIFT TUTORIALS Hot Pads, with Buffalo Plaid, Vintage Trucks, Vinyl, Iron On, Wood, Metal & Fabric Combined, Fabric Baskets

Posted on

DIY Woodland Fox Fawn Owl Costume with Cricut

EASY! All you need is some felt & a glue gun! DIY Cricut Halloween Costumes Hack

DIY Woodland Fox Fawn Owl Costume with Cricut

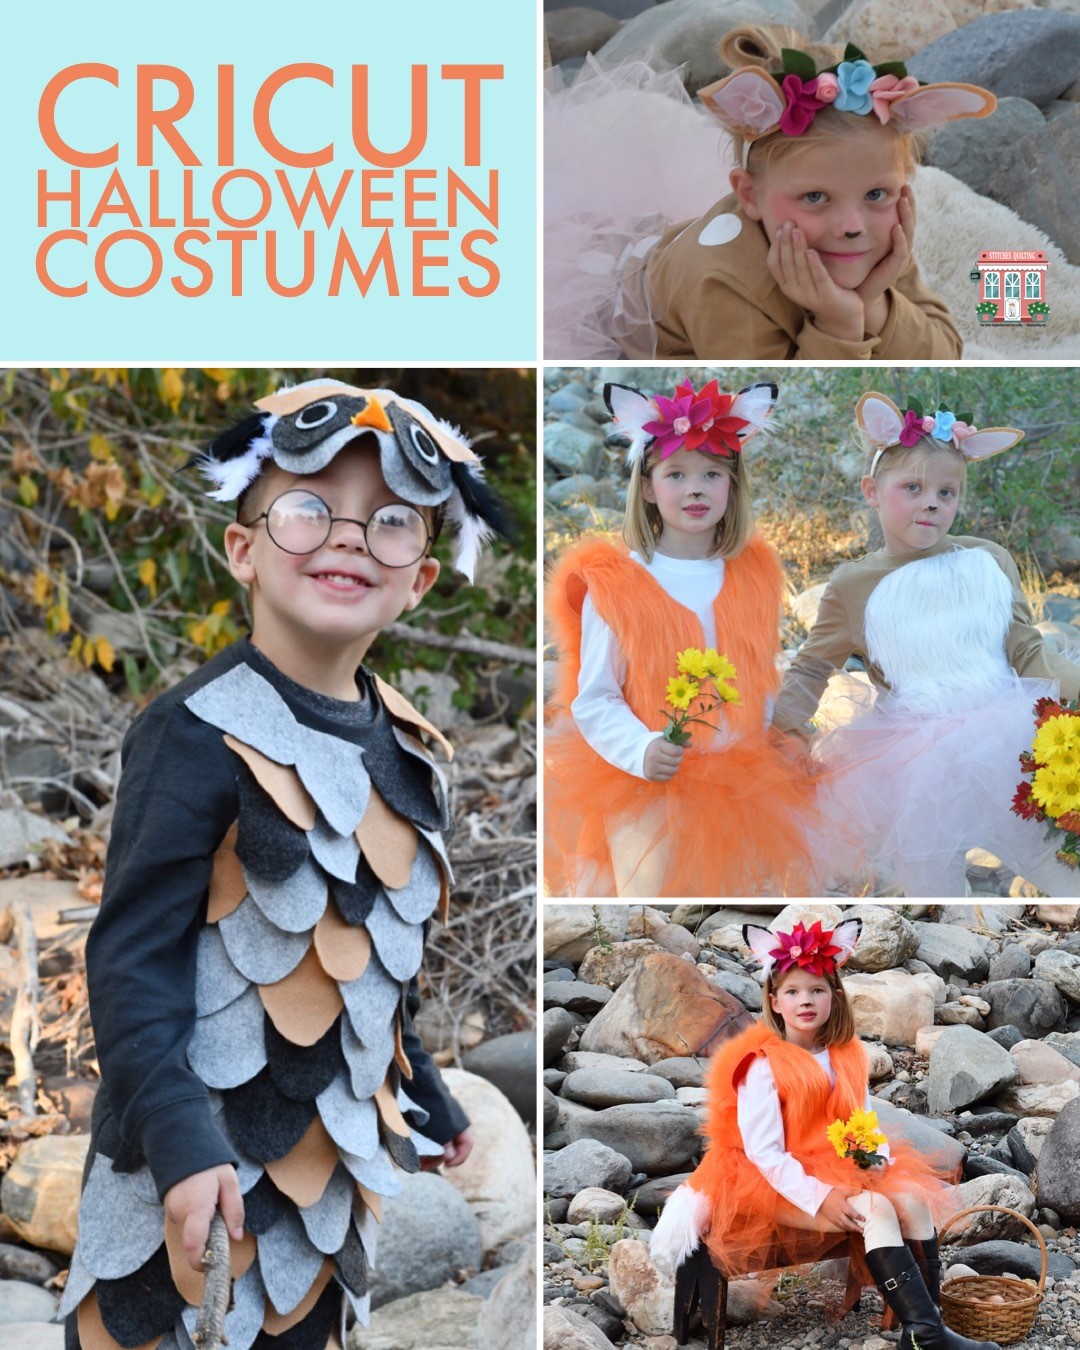
Easily create your own DIY Woodland Fox, Fawn or Owl Costume with Cricut!  These costumes went together so quickly and inexpensively too!

Easy Quick DIY Fawn Costume Pottery Barn Hack

This Fawn DIY Easy Woodland Costume is going to create a smile on your littles face!  Can you notice the iron on white spots on the Fawn’s back?

Our Fox is just enchanting with the stuffed fur tail, toile skirt and fur vest.  All fabric purchased at Joann Fabric Store!

Felt colorful flowers accented by white fur make this headpiece endearing.

Our Owl looks wise and curious!  This DIY Owl Woodland costume has the perfect amount of expression without overbearing the personality of your little!

DIY HACK Owl Costume Supplies Needed for Cricut Maker

Supplies Needed for the Owl costume as we made it include everything pictured above and a head band from Joann Fabric Store to hot glue.

These Woodland Costumes were made with the Cricut Maker web

Using the Cricut Maker with the new rotary cutting blade makes cutting out these Acrylic Felt Fabrics for DIY costumes a breeze!

Building Owl Woodland Costume by hot gluing Cricut cut felt feathers to a long sleeved shirt

Start out first by purchasing some long sleeved shirts to build your desired costume on.  The Woodland Owl costume we purchased a matching sweatpant with the long sleeved shirt.  The Fawn costume used a tan long sleeved shirt and the Fox costume used a white long sleeved shirt.  After cutting out the Owl Feathers on the Cricut Maker you then hot glue the accents to the shirts, these costumes come together quickly!

Owl Costume Cricut Community DIY Instructions & SVG Files to Make

Get cutting right away on the Owl DIY Costume with all the Cut files in the Cricut Community click here.

Fawn Costume Cricut Community DIY Instructions & SVG Files to Make

Jump over to the Cricut Community to have access to cut everything you need to make the DIY Fawn Deer Costume with the Cricut Maker click here!

Fox Costume Cricut Community DIY Instructions & SVG Files to Make

Interested in your little being the enchanting Fox costume then click here to visit the Cricut Community because I have shared all of my cut files with you!  Please share what you make by using the #stitchesquilting hashtag on Instagram or tag me with @stitchesquilting on Facebook or Instagram.

DIY Hack Fawn Costume Supplies Needed

The Fawn Costume supplies needed are in the picture above!

Assemble the Fawn Headband web

Use a hot glue gun to assemble the Fawn Headband.

DIY Hack Fawn Headband Costume Cricut

Our Fawn Woodland Animal Headband finished up like the image above.  BAM – the power of the Cricut Maker!  Remember you can cut all these files out for yourself by following the link above!

How to Make a DIY Fox Costume Headband

The Fox and Fawn Ear are wrapped around the back of the headband underneath to be hot glued on.

DIY Hack Fox Headband Cricut

Fox Headband completed and embellished!

DIY Hack Fox Costume Supplies Needed from Joann Fabric

Fox Tail supplies needed and can be purchased at Joann Fabric Store

Sewing the Furry Fox Tail DIY Cricut Costume web

Sew the orange fur and white fur together to make the fox tail.  We brushed ours after stitching the fur to pull the fur out of the seam.

DIY Hack Fox Costume Halloween

The Fox costume looks like above when completed.

DIY Hack Fox Costume Furry Tail

Fox Tail completed and stuffed!

DIY EASY Fox Costume to Cut with the Cricut web

The Fox costume is just dreamy!

Close up of the Fawn headband, but remember you can customize yours to be any color or type of flower the cut file has options for you!

Woodland Fox and Fawn Costumes DIY Cricut Easy web

The Fox and Fawn costumes are just lovely!

DIY Cricut Owl Costume Wise Book Reading 5469 web

Gotta love our wise little Owl getting ready to read!

Deanna Wall Stitches Quilting Stitching Through LifeDeanna Wall Stitches QuiltingStitches Quilting Online Neighborhood Quilt Store & Blog

This is a sponsored conversation written by me on behalf of Cricut. The opinions and text are all mine.


Posted on

DIY Fitted Sheet Hack – Stay Put

01 Do your sheets crawl off your bed waking you up

DIY Fitted Sheet Hack – Stay Put

You need 2 yards of Elastic for one set of sheets.

Buy Now at Stitches Quilting

Elastic 1 inch wideStretchrite Elastic 1 inch wide Polyester


DIY Fitted Sheet Hack – Stay Put Instructions

01 Do your sheets crawl off your bed waking you up

2 DIY SHEET HACK Fix your sheets for a good night sleep

3 All You Need is ELASTIC

5 Mark sheet 12 inches stretched from center

6 Mark your sheet 12 inches stretched from center corner seam

7 Mark on the left side 12 inches stretched from center corner seam of sheet

8 Both sides of corner sheet seam are marked with green sharpie

9 - 1 inch wide by 18 inches long elastic will stretch up to 24 inches
9 – 1 inch wide by 18 inches long elastic will stretch up to 24 inches

10 Pin the 1 inch Elastic to the Green Sharpie Mark

11 Left Green Sharpie Marker Point is pinned to the 1 inch elastic end

12 Mark the right Sharpie Green Marker point to the opposite end of the 1 inch wide elastic

13 Right Green Sharpie Marker Point is pinned to the 1 inch elastic end

14 Each end of the 18 inch elastic is pin to both corners of the fitted sheet

15 Use a Zig Zag Stitch to sew the 1 inch wide elastic to the thin elastic on the fitted sheet

16 Reverse Zig Zag Stitch back and forth to secure the elastic on the fitted sheet

17 Looks very sturdy - I used red thread so you can see my stitches
17 Looks very sturdy – I used red thread so you can see my stitches

18 Get ready to stitch the right side elastic to the sheet

19 Notice the Elastic is matched up to the Green Sharpie Mark

20 Repeat your zig zag stitching for the right side of the corner of the fitted sheet

21 Both side of the sheet corner are secured with elastic - Now Repeat on the remaining corners of the sheet
21 Both side of the sheet corner are secured with elastic – Now Repeat on the remaining corners of the sheet

22 Repeat the steps on the remaining corners of the sheet

23 DIY SHEET HACK - Your Favorite Sheet Will Not STAY PUT
23 DIY SHEET HACK – Your Favorite Sheet Will Not STAY PUT

24 DIY Sheet Hack full tutorial at Stitches Quilting

25 For More Sewing and Quilting Tutorials Follow Stitches Quilting

Please comment below with questions.

Deanna Wall Stitches Quilting Stitching Through LifeDeanna Wall Stitches QuiltingStitches Quilting Online Neighborhood Quilt Store & Blog

Posted on 15 Comments

Quick Halloween DĂ©cor Sewing, Quilting and DIY IDEAS

I love fabric and here is a playfully bright quilt that I made with fabrics collected through the years. I just love my antique cloths pins that this quilt is hung on. Can you see the pumpkins that I long arm quilted into the layers!

It’s time for the Eerie Nights Blog HOP!!!!

Eerie Night Blog Hop

Halloween is the favorite holiday of my 20 year old son, Luke.  I have collected Halloween and Fall décor for years.  In fact, last year, there were so many bins that I donated a huge bin to his school.  I wanted to share with all of you some of our Halloween staples that have become part of our family tradition to pull out and arrange.

I also wanted to share with you some amazing playful outdoor home décor that I see around our neighborhood!

I love fabric and here is a playfully bright quilt that I made with fabrics collected through the years.  I just love my antique cloths pins that this quilt is hung on.  Can you see the pumpkins that I long arm quilted into the layers!

I love fabric and here is a playfully bright quilt that I made with fabrics collected through the years. I just love my antique cloths pins that this quilt is hung on. Can you see the pumpkins long arm quilted into the layers!

I enjoy sewing Halloween Trick or Treat Bags for my kids and have lots of extras for their friends too!  All of the trick or treat bags are interchangeable and were sometimes made to coordinate with their costume.  I had lots of fun taking these photographs!

II enjoy sewing Halloween Trick or Treat Bags for my kids and have lots of extras for their friends too! All of the trick or treat bags are interchangeable and were sometimes made to coordinate with their costume. I had lots of fun taking these photographs! Setting up tables with Halloween settings that include bright Halloween fabric table runners. This table runner was so simple to make with basic squares and actually has no batting in it so it is sewn like pillow case and then turned inside and out.

 Setting up tables with Halloween settings that include bright Halloween fabric table runners. This table runner was so simple to make with basic squares and actually has no batting in it so it is sewn like pillow case and then turned inside and out.

This is our dining table room table decorated!  The table runner is simple, just small scraps of fabric squares stitched together and bordered.  Halloween decorations are out for such a short time of year so why make something too complicated?  Upright in a glass sundae cup are table triple dipped pretzel rods in caramel, chocolate and then green dipping chocolate with an almond slice as a fingernail for a witches finger!  My kids and I love making and eating these!  The Halloween platter closest to you has double dipped caramel apples!  There is nothing like enjoying apples in the fall!  What recipes do you enjoy?  We have several and one of our favorites is caramel and chocolate dipped apples!  This year we dipped the caramel apples in expensive Peter’s Caramel and then grocery store purchased caramels.  What a difference the block of caramel from Peter’s made!  The melting point was lower so the caramel during the night didn’t slip off the apple like the inexpensive caramels.  But to tell you the truth after we dipped both sets of caramel dipped apples and then dipped them in chocolate, we really couldn’t taste much of a difference.  Just chill the apples with the dipped caramel before you leave dip them in the chocolate!  YUM!


This is our dining table room table decorated! The table runner is simple, just small scraps of fabric squares stitched together and bordered. Halloween decorations are out for such a short time of year so why make something too complicated?

What about right outside your dining room door!  Here are some great ideas for outdoor FUN!

Here are some great ideas for outdoor FUN! What could be more fun than a witch's legs upside down?How about just decorating your lovely gardens with some Halloween embellishments!  It doesn’t take much!  These are some old pieces of wood cut and simply painted.

How about just decorating your lovely gardens with some Halloween embellishments! It doesn't take much! These are some old pieces of wood cut and simply painted.

Hallo RIP 1600

Just add some pumpkins or gourds here or there for some Halloween Glam.

Just add some pumpkins or gourds here or there for some Halloween Glam.

These pumpkins are ready for a masquerade!

These pumpkins are ready for a masquerade!Your Halloween yard art can be as simple or complex as your imagination!

Your Halloween yard art can be as simple or complex as your imagination! Skeleton pirate with skeleton dog.

Then there is our fireplace mantles, this year I decided to go a bit smaller and simpler.  Well my boys and great nieces decorated the house this year.  They love when I say to get the orange and black bins from the garage and I love to see where they put everything!  That is some kid fun isn’t?

Then there is our fireplace mantles, this year I decided to go a bit smaller and simpler. Well my boys and great nieces decorated the house this year. They love when I say to get the orange and black bins from the garage and I love to see where they put everything! That is some kid fun isn't?

But back to the stitching, I sure had a lot of fun stitching together Rosie the Zombie in Zombie Love Fabric designed by Emily Taylor for Riley Blake Designs.  Over three feet tall she it was a blast seeing her come together.  There is a tutorial on how to construct Rose the Zombie here.

Fun stitching together Rosie the Zombie in Zombie Love Fabric designed by Emily Taylor for Riley Blake Designs. Over three feet tall she it was a blast seeing her come together.

Zoe the Zombie and Bones the Immortal Dog were also a lot of fun to create from Zombie Apocalypse Fabric Panel by Emily Taylor Designs with Riley Blake Fabrics.  Before I assembled them, I long arm quilted the panel which gave such shape and form to their personalities!

Zoe the Zombie and Bones the Immortal Dog were also a lot of fun to create from Zombie Apocalypse Fabric Panel by Emily Taylor Designs with Riley Blake Fabrics. Before I assembled them, I long arm quilted the panel which gave such shape and form to their personalities!Halloween is a time for family fun and to bring neighborhoods and communities together!  What are some of your favorite Halloween items that bring that playful feel to your family?  Remember enjoy the moment and find delight!

Zombie Quilt Fabric Ideas

The next Halloween items that I am making for my home will include a Immortal Zombie with a bit of Zombie love quilt and table runner!  Check out the fabrics that I will be using for this project!  My husband is excited to have these items completed!  Won’t they be fun!  My husband wants it to look ripped up and fun!  Any piecing or quilting suggestions?


Now how about a giveaway…
A beautiful thread set from
Aurifil.  Go to the Sew Incredibly Crazy to enter the Giveaway!

I hope you enjoyed your stop here
and please stop by the rest of the
hoppers for today.

Best Wishes for Lots of Eerie Playful Stitches!
Deanna Stitching Through Life