Posted on

Cyber Monday Quilt Fabric Week Long Sale

Cyber Monday Quilt Fabric Sale Week Long Sale

It’s a Small Business Saturday and Cyber Monday Week Long Fabric Sale!  No Coupon Codes are needed as all sale prices are LIVE in the store right now!  All quilting cotton fabrics are $4.00 to $6.00 per yard!  No really and seriously!  Best SALE ever eh?

Can’t wait to see what everyone purchases!  Let’s not break the bank quilting and sewing!

Other coupon codes cannot be combined during this sale.

Cyber Monday Quilt Fabric Sale Week Long Sale

XOXO,

Deanna Wall Stitches Quilting Stitching Through Life

Posted on

Cricut Maker Quilt Sew Many Squares

Cricut Maker Sew Many Squares Quilt Amy Butler Free Spirit Fabric

Cricut Maker Quilt Sew Many Squares

Cricut Maker Quilt Sew Many Squares – Can’t wait to cozy up with this quilt cut with the Cricut Maker using the Rotary Blade and Fabric Grip Mat.

Cricut Maker Finished Quilt with Quilting

Buy Now at Stitches Quilting

Sew Many Square Quilt Kit with Amy Butler of Free Spirit Fabrics for the Cricut MakerCricut Maker Cutting Fabric

Cut fabric with the Cricut Maker is like cutting butter!  Yum!  Can’t wait to play!

Cricut Maker Cutting Fabric

The Sew Many Squares Throw Quilt is a Free Cricut Maker Project.

Cricut-Maker-Sew-Many-Squares-QuiltCricut-Maker-Sew-Many-Squares-QuiltCricut-Maker-Sew-Many-Squares-Quilt

Each Cricut Maker Project Outlines all of the materials that you need.  Materials list along with complete instructions can be printed off or always accessible on your mobile or computer through Design Space.  You never have to forget your list when you get to the store.

Cricut-Maker-Design-Space-Quilt

Here is a peek at the Sew Many Squares Throw Quilt Instructions.  All Cricut Maker Sewing Projects have instructions similar to this.

Cricut-Maker-Sew-Many-Squares-Quilt-Instructions

Let’s start by cutting the fabric on the Cricut Maker!  I always put the pretty side down on the fabric mat but had to showcase the fabric facing up for a quick photo!

Cricut Maker Cutting Fabric

This is what the Cricut Design Space screen prompts look like when you cut fabric.

Cricut-Maker-Quilt-Ready-to-Cut

The Four Patch squares are being string pieced on the sewing machine with the digital instructions in the background.

Cricut Maker Instructions with Quilt Blocks Sewn

Now ready to piece the four squares together!

Cricut Maker Ready to Sew Quilt Blocks

The four square blocks are coming together nicely!

Sew Many Squares Quilt Cricut Maker 4 Square Block

The beautiful Amy Butler Eternal Sunshine large squares cut out by the Cricut Maker are labeled and laid out to stitch to the four square quilt blocks.

Sew Many Squares Quilt Blocks cut with Cricut Maker

The Sew Many Squares Quilt is ready to be snuggled…  Stitches Quilting Fabric Kits available for this quilt with Amy Butler Eternal Sunshine collection by Freespirit Fabrics.

Cricut Maker Sew Many Squares Quilt Amy Butler Free Spirit Fabric

Buy Now at Stitches Quilting

Sew Many Square Quilt Kit with Amy Butler of Free Spirit Fabrics for the Cricut MakerCricut Maker Cutting Fabric


Any questions you have about cutting fabric with the Cricut Maker? 

This is a sponsored conversation written by me on behalf of Cricut. The opinions and thoughts are all genuinely mine.

Posted on 1 Comment

Cricut Sewing I-Spy Quilt Sparkle Iron On

Cricut I-Spy Quilt with Vinyl Lettering


Cricut Sewing I-Spy Quilt Sparkle Iron On

How about adding a bit of sparkle to your I-Spy Quilt? You can do it easily with a Cricut Cutting Machine and some Cricut Sparkle Iron On.

Let’s start out with 5 inch squares of novelty fabrics that you would like to showcase. I’ve accented each block with a 2.5 inch strip of Riley Blake Solids red, yellow and blue.

I Spy Quilt Cricut Design Space Lettering Reversed for Vinyl

Then open on your computer Cricut Design Space. I’ve used a basic Cricut Sans Font in lower case to spell out I-Spy words to find.

Cricut Design Space I-Spy Quilt Vinyl Lettering

Don’t forget to reverse your letters to print on iron on and selection glitter iron on to cut.

I Spy Quilt Cricut Design Space Lettering Reversed for Vinyl


Below is a video step by step creating this quilt with Cricut Red Sparkle Iron On.

<iframe width=”560″ height=”315″ src=”https://www.youtube.com/embed/jZP9L7r4NcI” frameborder=”0″ allowfullscreen></iframe>


Remember the basic block construction for this quilt block is a 5 inch novelty square with a red 2.5 x 5 inch strip, pressed and then a 2.5 x 7 inch yellow or blue strip added to square it up.

Please tag me in a photo if you try this technique.  Ask any questions that you may have below.  I will have a download of the quilt pattern available.

Buy Now at Stitches QuiltingEasily make an I SPY quilt with 5 inch I SPY CHARM PACK QUILTINGI-Spy 5 inch charm packs are available at Stitches Quilting in the bundle of 20 squares.  You can purchase multiple bundles with unique squares while selected if you want it gender themed or neutral.  I have LOVED making I-Spy quilts through the years for my kiddos!  I think this quilt is spectacular with added glitter lettering!


Buy Now at Stitches QuiltingClick here to purchase the Red Cayenne Riley Blake Confetti Cotton Solid for this quiltConfetti Cottons Cayenne Red Solid C100-50 Riley Blake Fabric


Buy Now at Stitches QuiltingRiley Blake Confetti Cotton Solid Yellow Fabric C100-61 Sunshine

Click here to purchase the Yellow Sunshine Riley Blake Confetti Cotton Solid for this quilt


Buy Now at Stitches QuiltingRiley Blake Confetti Cotton Blue Demin Solid C120

Click here to purchase the Blue Demin Riley Blake Confetti Cotton Solid for this quilt


Click here to browse Cricut products Cricut Logo

Can’t wait to see what you create!

Enter to Win a Cricut Explore Air 2 HERE

Week One: July 19th
Sweet Red Poppy
Whisk’em
Fleece Fun
Made For Mermaids
Sew Much Ado
That’s Sew Kari
Inside The Hem
Lily Shine Creates
The Simple Life Company
Riva La Diva
My Sweet Sunshine Studio
SewSophieLyn

Week Two: July 26th
Made By Melli
Stitches Quilting
Swoodson Says
The Sara Project
Maker Style
Wild and Wanderful
Sookee Designs
Life Sew Savory
Paisley Roots
Spindle and Seams
Feathers Flights
Sew What Alicia
The Tattooed Quilter
Amber Simmons
Coral and Co.

This is a sponsored post by Cricut BUT – I LOVE all their products and can’t say more about them!  Can’t wait to share with you MORE quilting and sewing ways to use Cricut products!

I was invited to participate in the Cricut Party Blogger Program Kickoff.

This experience is based strictly on my opinion.  Others may have a different opinion or experience with the product listed above.  I was provided the sample free of charge by the company or PR agency and I have given my honest opinion.

This is a sponsored conversation written by me on behalf of Cricut. The opinions and text are all mine.

XOXO,

Deanna

POST DISCLAIMER:
This is a sponsored conversation written by me on behalf of Cricut. The opinions and text are all mine.

READER COMMENT DISCLAIMER:
Comments submitted may be displayed on other websites owned by the sponsoring brand.


Posted on 4 Comments

Let’s Bloom in Quilting

Bloom Quilt Blog Hop

I’m excited to be part of the Stitching Stars Bloom Blog Hop…. There are some great Quilters blogging about “Bloom”

Floral fabrics are just exquisite and fun to collect!  It makes me think of the beautiful days out in the sun!  Floral Blooming Quilts are spectacular to snuggle up in on a Spring day!

How do we use the floral fabrics that we have?

Boxy Floral Quilt

Here is a simple fun idea to create a floral quilt by piecing squares together!  We don’t need to make life difficult to cut into and enjoy our floral fabrics!

Joel Dewberry Cali Mod Fat Quarter Bundle

Now look at this gorgeous collection of Joel Dewberry Cali Mod Fat Quarter Bundle with Free Spirit Designs!  Don’t you want to make a quilt to wrap up in while enjoying this stream!  I do… So let’s get an idea for how to use this collection.

Joel Dewberry Cali Mod Fat Quarter Bundle Fan Out


Here is this beautiful floral fabric collection fanned out for you so you can see the actual designs.  How shall we use these fabrics to celebrate the Cali Mod Florals and coordinating prints.  Well the first quilt was an orange peel method, and second quilt florals cut up into squares.  How about using triangles?

Joel Dewberry Cali Mod Triangle Pop tall

Here are the Joel Dewberry’s fabrics cut up into triangles, sashed with white fabric!  Doesn’t it make the fabric POP?  By using an equilateral triangle to cut up the fabric you really see this fabric celebrated!   A fat quarter bundle of Joel Dewberry’s Cali Mod fabric is available on sale for $49.95 but take an additional 30% off this bundle with the coupon code “springfling” in your shopping cart to get the 24 piece Fat Quarter Bundle for only $34.99!

There are so many ways to use floral prints and bloom into the season!  What ideas do you have for blooming quilts?

Stitch Smarter Facebook Banner

On this Bloom Blog Hop we are also giving a business tip for your Quilting or Sewing Online Business.  My tip is to learn everything that you can about social media to push the beautiful things that you make for the world to see.  I created a Facebook Group called Stitch Smarter to grow our Stitch related businesses SMARTER!  It’s a free group to join so click the link to Facebook and join us on our creative journey!    Last week we learned how to utilize Facebook with our Business Pages and this week we are learning Instagram business use.  It’s a collaborative group with live videos to watch, assignments and more!  Let’s bloom and grow our businesses together!

Now remember the entire inventory of fabric, patterns, notions, book at Stitches Quilting is 30% off your shopping cart by using the coupon code “springfling”!  It’s time for a Spring fabric haul!  A lot of the fabric is already deeply discounted getting you a discount of up to 60% off.

Stitches Quilting Quilt Sew Fabric Sale 60% OFF

There are so many lovely quilters sharing their quilting bloom ideas!  Be sure to visit each person on the blog hop as outlined below!

Monday, April 3, 2017
Lissa LaGreca: Lovingly Lissa
Carmen Ross: See Carmen Sew
Tuesday, April 4, 2017
Sherry Shish: Powered by Quilting
Becca Fenstermaker: Pretty Piney
Wednesday, April 5, 2017
Lisa Peterson: Lisa and Lorelai
Deanna Wall: Stitches Quilting
Thursday, April 6, 2017
Vanessa Behymer: Vintage Barngirl
Paula Mamuscia: Creations by Paula
Friday, April 7, 2017
Andi Stanfield: True Blue Quilts
Blossom Blog Hop Quilt Giveaway
Enter to win this quilt through Rafflecopter!

a Rafflecopter giveaway

Deanna Wall Stitches Quilting Stitching Through Life

Posted on

Fabric Planner Bookmark Paperclip

Fabric Planner Bookmark Paperclip Quilters Planner

Fabric Planner Bookmark Paperclip

How about a simple DIY Planner Bookmark Paperclip embellished with your favorite fabric!

amy sinibaldi fabric Paperclip Bookmark Quilters Planner

Here I selected Amy Sinibaldi Playground Art Gallery fabric to embellish the Paperclip Bookmark for the Quilters Planner.

amy sinibaldi fabric Paperclip Bookmark Quilters Planner

Pick up an extra large paper clip from your local office supply or craft store.  I selected two sets of three fabrics each from Amy Sinibaldi Playround Art Gallery Fabric Collection so I could have two different identifying bookmarks for my Quilter’s Planner.

fabric Paperclip Bookmark Quilters Planner

Cut two strips of each fabric that was 1/3 inch by 18 inches.  I thought it was a lovely organic touch to cut the fabric strips with scizzors instead of a rotorary cutter.  Divid the 18 inch strip into segments of fourths as shown below.

fabric Paperclip Bookmark Quilters Planner

Now you have 8 pieces of three different kind of fabrics.  The pieces measure 1/4 inch by 4.5 inches.

Tie each piece of fabric to the top of the paperclip alternating the colors.

fabric Paperclip Bookmark Quilters Planner

This way you will be able to differentiate which bookmark is indicating a particular section.  Now remember this can be used for any planner or book.  This is such a simple project to celebrate your fabric collection of fabrics!

XOXO,

Deanna Wall Stitches Quilting Stitching Through Life

Posted on 15 Comments

Quick Halloween DĂ©cor Sewing, Quilting and DIY IDEAS

I love fabric and here is a playfully bright quilt that I made with fabrics collected through the years. I just love my antique cloths pins that this quilt is hung on. Can you see the pumpkins that I long arm quilted into the layers!

It’s time for the Eerie Nights Blog HOP!!!!

Eerie Night Blog Hop

Halloween is the favorite holiday of my 20 year old son, Luke.  I have collected Halloween and Fall décor for years.  In fact, last year, there were so many bins that I donated a huge bin to his school.  I wanted to share with all of you some of our Halloween staples that have become part of our family tradition to pull out and arrange.

I also wanted to share with you some amazing playful outdoor home décor that I see around our neighborhood!

I love fabric and here is a playfully bright quilt that I made with fabrics collected through the years.  I just love my antique cloths pins that this quilt is hung on.  Can you see the pumpkins that I long arm quilted into the layers!

I love fabric and here is a playfully bright quilt that I made with fabrics collected through the years. I just love my antique cloths pins that this quilt is hung on. Can you see the pumpkins long arm quilted into the layers!

I enjoy sewing Halloween Trick or Treat Bags for my kids and have lots of extras for their friends too!  All of the trick or treat bags are interchangeable and were sometimes made to coordinate with their costume.  I had lots of fun taking these photographs!

II enjoy sewing Halloween Trick or Treat Bags for my kids and have lots of extras for their friends too! All of the trick or treat bags are interchangeable and were sometimes made to coordinate with their costume. I had lots of fun taking these photographs! Setting up tables with Halloween settings that include bright Halloween fabric table runners. This table runner was so simple to make with basic squares and actually has no batting in it so it is sewn like pillow case and then turned inside and out.

 Setting up tables with Halloween settings that include bright Halloween fabric table runners. This table runner was so simple to make with basic squares and actually has no batting in it so it is sewn like pillow case and then turned inside and out.

This is our dining table room table decorated!  The table runner is simple, just small scraps of fabric squares stitched together and bordered.  Halloween decorations are out for such a short time of year so why make something too complicated?  Upright in a glass sundae cup are table triple dipped pretzel rods in caramel, chocolate and then green dipping chocolate with an almond slice as a fingernail for a witches finger!  My kids and I love making and eating these!  The Halloween platter closest to you has double dipped caramel apples!  There is nothing like enjoying apples in the fall!  What recipes do you enjoy?  We have several and one of our favorites is caramel and chocolate dipped apples!  This year we dipped the caramel apples in expensive Peter’s Caramel and then grocery store purchased caramels.  What a difference the block of caramel from Peter’s made!  The melting point was lower so the caramel during the night didn’t slip off the apple like the inexpensive caramels.  But to tell you the truth after we dipped both sets of caramel dipped apples and then dipped them in chocolate, we really couldn’t taste much of a difference.  Just chill the apples with the dipped caramel before you leave dip them in the chocolate!  YUM!


This is our dining table room table decorated! The table runner is simple, just small scraps of fabric squares stitched together and bordered. Halloween decorations are out for such a short time of year so why make something too complicated?

What about right outside your dining room door!  Here are some great ideas for outdoor FUN!

Here are some great ideas for outdoor FUN! What could be more fun than a witch's legs upside down?How about just decorating your lovely gardens with some Halloween embellishments!  It doesn’t take much!  These are some old pieces of wood cut and simply painted.

How about just decorating your lovely gardens with some Halloween embellishments! It doesn't take much! These are some old pieces of wood cut and simply painted.

Hallo RIP 1600

Just add some pumpkins or gourds here or there for some Halloween Glam.

Just add some pumpkins or gourds here or there for some Halloween Glam.

These pumpkins are ready for a masquerade!

These pumpkins are ready for a masquerade!Your Halloween yard art can be as simple or complex as your imagination!

Your Halloween yard art can be as simple or complex as your imagination! Skeleton pirate with skeleton dog.

Then there is our fireplace mantles, this year I decided to go a bit smaller and simpler.  Well my boys and great nieces decorated the house this year.  They love when I say to get the orange and black bins from the garage and I love to see where they put everything!  That is some kid fun isn’t?

Then there is our fireplace mantles, this year I decided to go a bit smaller and simpler. Well my boys and great nieces decorated the house this year. They love when I say to get the orange and black bins from the garage and I love to see where they put everything! That is some kid fun isn't?

But back to the stitching, I sure had a lot of fun stitching together Rosie the Zombie in Zombie Love Fabric designed by Emily Taylor for Riley Blake Designs.  Over three feet tall she it was a blast seeing her come together.  There is a tutorial on how to construct Rose the Zombie here.

Fun stitching together Rosie the Zombie in Zombie Love Fabric designed by Emily Taylor for Riley Blake Designs. Over three feet tall she it was a blast seeing her come together.

Zoe the Zombie and Bones the Immortal Dog were also a lot of fun to create from Zombie Apocalypse Fabric Panel by Emily Taylor Designs with Riley Blake Fabrics.  Before I assembled them, I long arm quilted the panel which gave such shape and form to their personalities!

Zoe the Zombie and Bones the Immortal Dog were also a lot of fun to create from Zombie Apocalypse Fabric Panel by Emily Taylor Designs with Riley Blake Fabrics. Before I assembled them, I long arm quilted the panel which gave such shape and form to their personalities!Halloween is a time for family fun and to bring neighborhoods and communities together!  What are some of your favorite Halloween items that bring that playful feel to your family?  Remember enjoy the moment and find delight!

Zombie Quilt Fabric Ideas

The next Halloween items that I am making for my home will include a Immortal Zombie with a bit of Zombie love quilt and table runner!  Check out the fabrics that I will be using for this project!  My husband is excited to have these items completed!  Won’t they be fun!  My husband wants it to look ripped up and fun!  Any piecing or quilting suggestions?


Now how about a giveaway…
A beautiful thread set from
Aurifil.  Go to the Sew Incredibly Crazy to enter the Giveaway!

I hope you enjoyed your stop here
and please stop by the rest of the
hoppers for today.

Best Wishes for Lots of Eerie Playful Stitches!
Deanna Stitching Through Life

Posted on 20 Comments

Four Square in a Nine Patch Modern Quilt Block

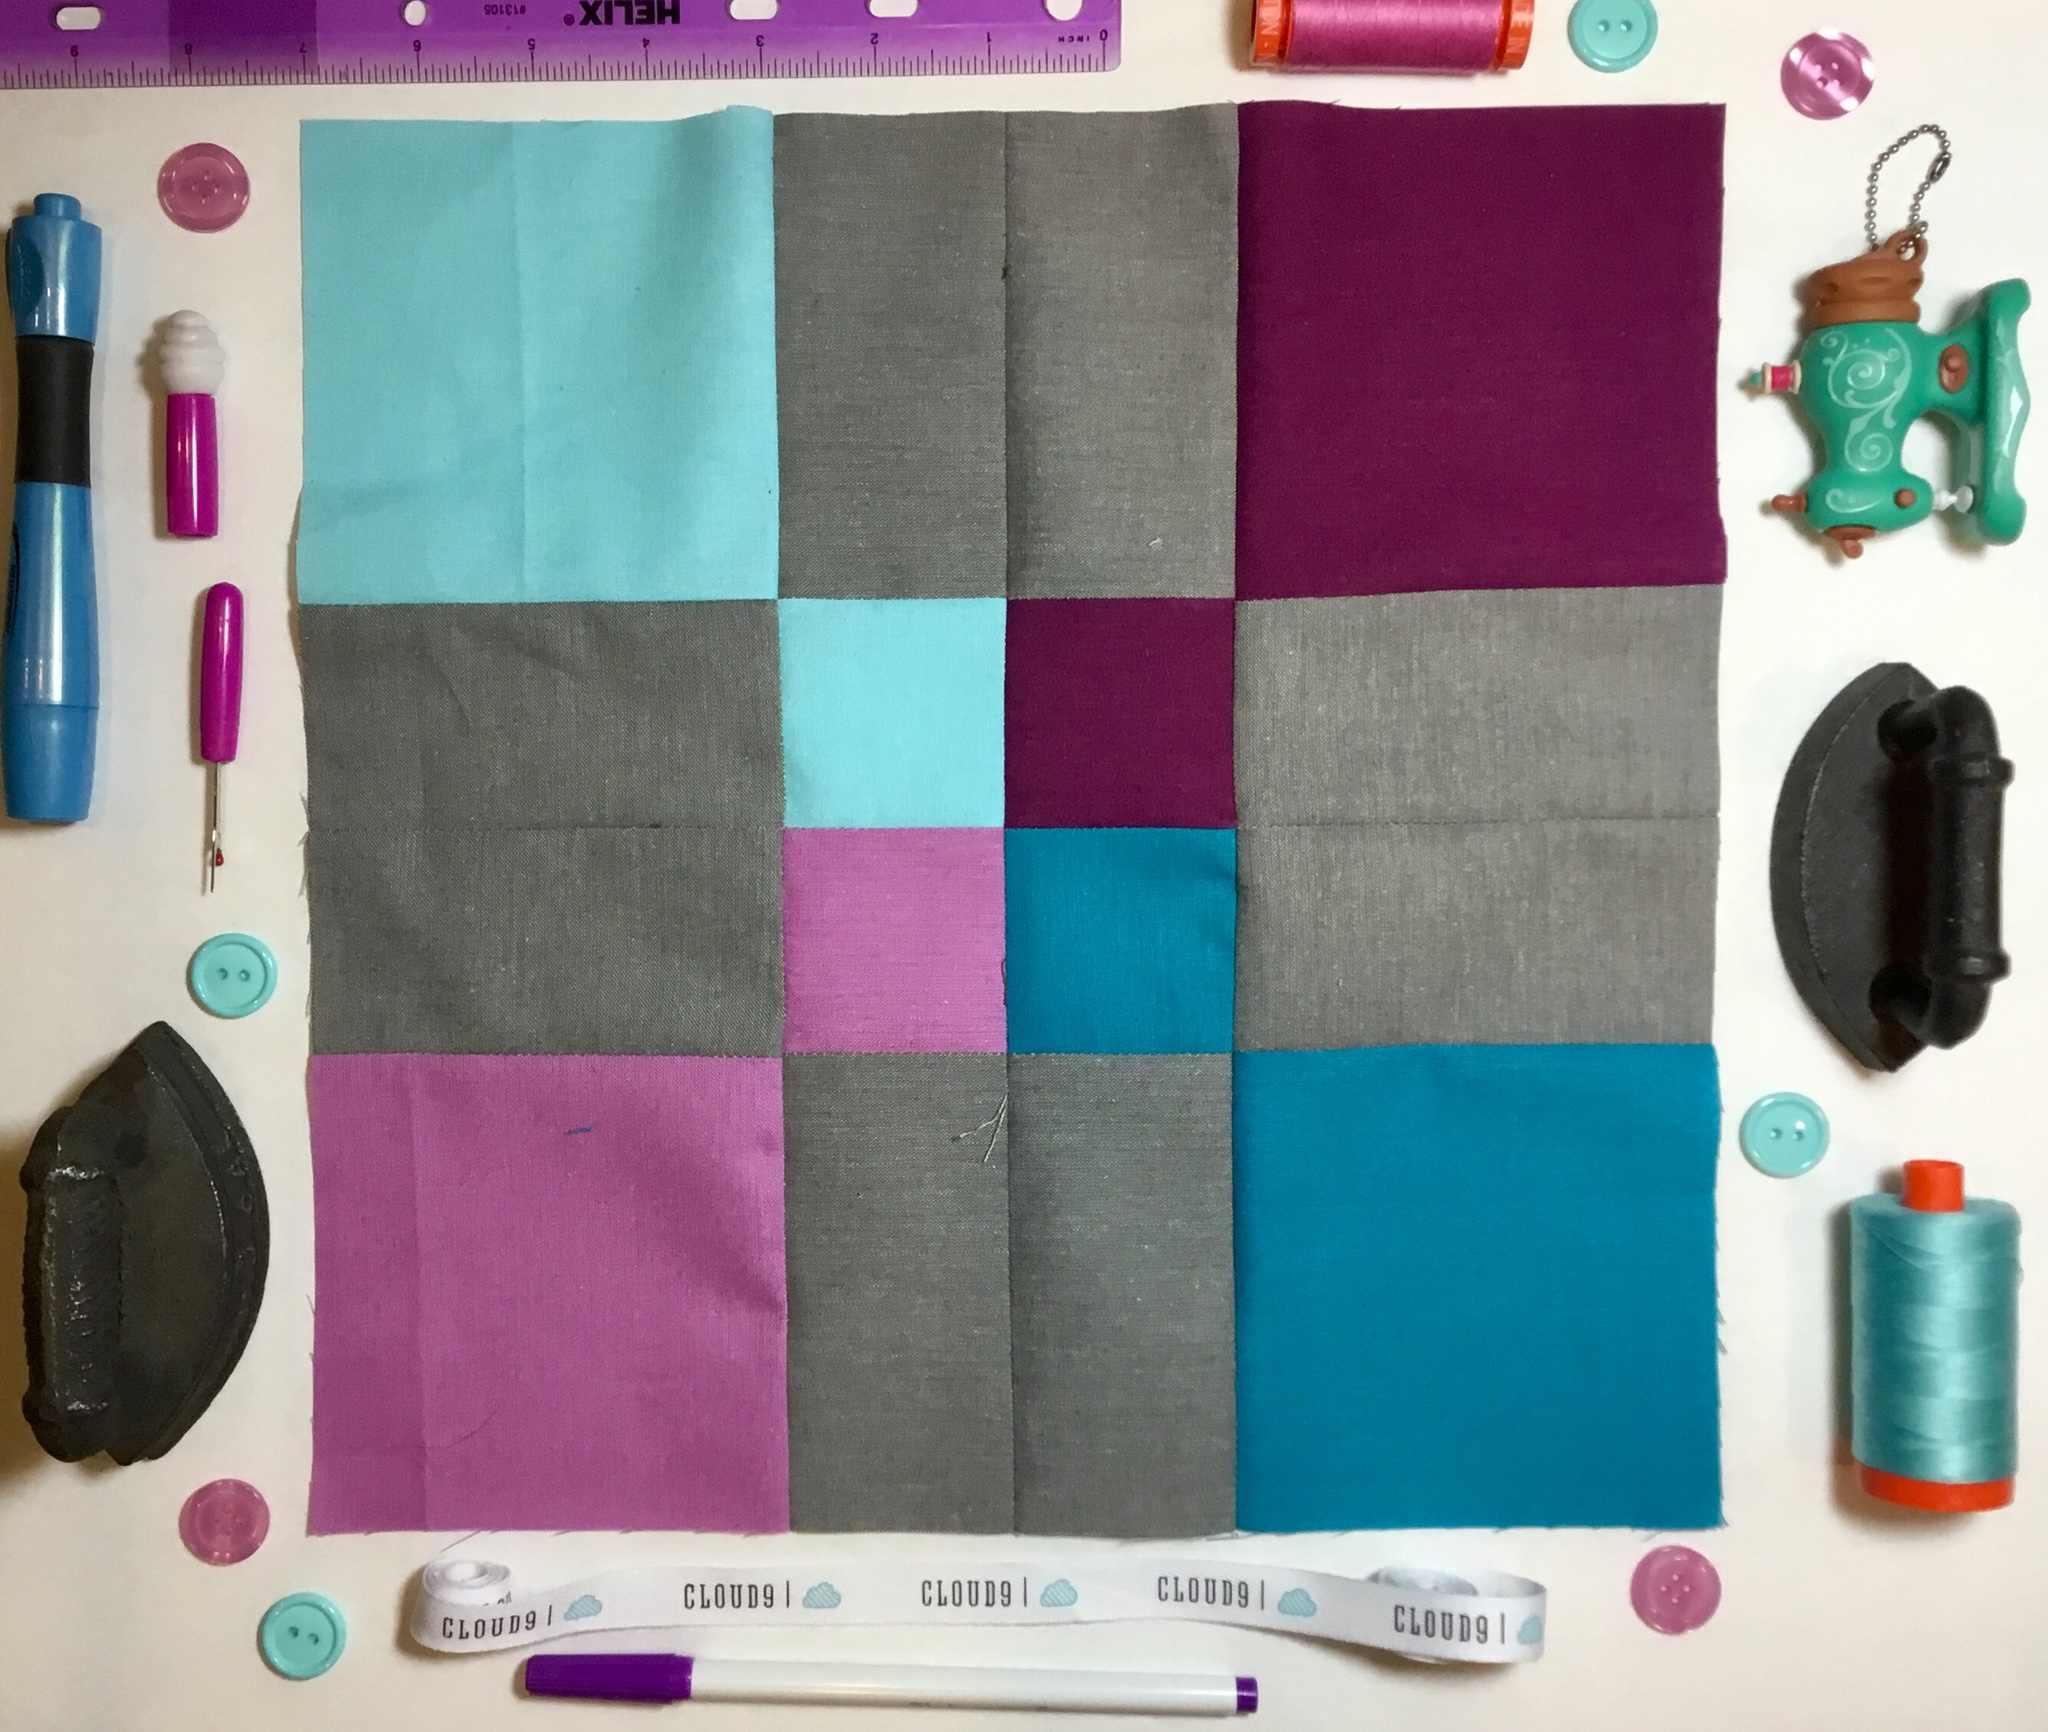
Four Square in a Nine Path Modern Block Cloud9 Cirrus Solids

Four Square in a Nine Patch Modern Block

Doesn’t Four Square bring back playground memories from elementary school?  The very first quilt I made 20 plus years ago was a nine patch.  I thought it would be fun to call this Four Square in a Nine Patch Modern Block for the 2016 Cloud9 CirruClou9 Cirrus Solids 2016 New Block Hops Solids New Block Blog Hop.  I received these fabrics from Cloud9 and they sat in my inbox as I


Daydreamed what I would create with these beautiful solids.  Every so often during my day, I loved reaching over and feeling the softness of these 100% Organic Cotton Solids.  YUM!  The colors of the Cloud9 Cirrus Solids are Amazon, Sky, Iris, Lilac and Shadow.

I’ve enjoyed the 100 days 100 blocks on social media from Tula Pink’s Book of Modern Blocks.  I thought to myself, how I appreciate simple but yet modern those blocks are.  So I decided to go simple and modern with these gorgeous fabrics for a modern block design. I hope that a beginning quilter won’t feel overwhelmed by the 4 square in a Nine Patch Modern Quilt block and a seasoned quilter may want to quickly bust this block out for a fast project.  The repeat is a stunning quilt but that is for a later post.

Let’s get started!  I’m using the Shadow gray in this block almost as if it is a background solid.  Then I selected the two blue Amazon and Sky to offset each other diagonally with the Iris and Lilac to offset each other diagonally.

To create the 12.5 inch finished block, use the following instructions:

Cut one 2.5 inch square block from each of the 4 colored fabrics – Amazon, Sky, Iris and Lilac

Clou9 Cirrus Solids 2016 New Block Hop

Now it’s time to cut one 5 inch square block from each of the 4 colored fabrics.  Don’t let these pictures fool you the upper picture is the 2.5 inch size blocks cut and then the lower picture is the 5 inch square blocks cut from each colored fabric.

Clou9 Cirrus Solids 2016 New Block Hop


Cut 1 – 2.5 inch strip by 42 inches long of the Grey Shadow.  Then cut the 2.5 inch strip into 8 – 2.5 x 5 inch strips.

This image is the 8 Grey Shadow strips laid out like a flower with all the scraps of the fabric as a center.  I’m sorry… even the scraps were so pretty that I was too tempted to play and make a pretty flower to display the grey strips.

Clou9 Cirrus Solids 2016 New Block Hop


Let’s start stitching!  

We are going to construct this block into 2 different sets of sections – “inner” and “outer”.  This is a layout of the inner section using the 4 – 2.5 inch square block in the inside and the 2.5 by 5 inch Grey Shadow Rectangle Blocks.

Four Square in a Nine Patch Modern Block Layout

Stitch the blocks together in two separate strips and then press them flat.

Using Clover Fork Pin to piece a quilt block


Press your inner block strips after stitching together.  Use the fork pins to match your seams and stitch the two inner block strips together.  Have you used fork pins before?  They are a lot of fun and get great matching seams.  If you want to purchase them from Stitches Quilting you can here.  They are also a great gift for your Quilty Sewing Friends for Christmas as an affordably priced item.

Four Square in a Nine Patch Modern Block Layout

After stitching the two inner block strips together, remove the fork pins and press.  This is what everything should look like now.

Using Clover Fork Pin to piece a quilt block Here is the layout of the outer section blocks and how they will be stitched together.  Now we are laying 2 of the 2.5 x 5 inch rectangles horizontally to each other with the 5 inch squares placed on either side of the rectangles.  Be sure to arrange your blue hues diagonally and the purple hues diagonally consistent with the inner block strip that you just stitched.

Four Square in a Nine Patch Modern Block Layout

After stitching the outer block rows together, press the outer block strips and then lay them out by the joined two inner block strips.  When laying out the outer blocks take note of the color pattern and confirm that you have the rows lined up to the color pattern that you desire.

Using Clover Fork Pin to piece a quilt block


Use fork pins to match your seams carefully and attch the two outer sections to the inner section as laid out above.  Press your block carefully to prepare the squaring up of your block to a 12.5 inch size. For convenience I am using a 12.5 inch square ruler to precisely square up my block.

Square up your quilt block Cloud9 Cirrus Solids


Here is what your finished block will look like.  There will be a post later this week to show you how to arrange this block into a full quilt with quilt size deminsions, cutting instructions and yardage needed.  Be sure to subscribe to Stitches Quilting to get an email with the FREE Four Square in a Nine Block Modern Quilt Pattern.

Four Square in a Nine Path Modern Block Cloud9 Cirrus Solids

I truly enjoyed working with these gorgeous Cloud9 Cirrus Solids.  I would recommend purchasing them.  I will place an order with Cloud9 to carry them in the store to purchase as yardage.  Use the yardage to make any of the blocks that you have seen on the Cloud9 Cirrus Solids New Block Blog Hop.

I want to thank our hosts and the 62 other bloggers that joined this blog hop and each created an unique modern block for you with a free pattern.  To visit the other quilt blogger pages you can click the links to follow them organized by the three separate days that we posted our blog posts.  You will be impressed with these brilliant women, quilt blocks and Cloud9 fabrics.

Monday, September 12th

Host: Yvonne @Quilting Jetgirl

Abigail @Cut & Alter
Janice @Color, Creating, and Quilting!
Lorinda @Laurel, Poppy, and Pine
Melva @Melva Loves Scraps
Renee @Quilts of a Feather
Kathryn @Upitis Quilts
Kim @Leland Ave Studios
Amanda @this mom quilts
Holly @Lighthouse Lane Designs
Irene @Patchwork and Pastry
Jennifer @Dizzy Quilter
Karen @Tu-Na Quilts, Travels, and Eats
Anne @Said With Love
Suzy @Adventurous Applique and Quilting
Sharla @Thistle Thicket Studio
Kathleen @Smiles From Kate
Amanda @Gypsy Moon Quilt Co.
Sarah @Sarah Goer Quilts
Chelsea @Patch the Giraffe
Jinger @Trials of a Newbie Quilter
Anja @Anja Quilts
Daisy @Ants to Sugar

Tuesday, September 13th

Host: Cheryl @Meadow Mist Designs

Miranda @I Have Purple Hair
Jennifer @The Inquiring Quilter
Sarah @123 Quilt
Leanne @Devoted Quilter
Jen @Patterns By Jen
Jennifer @RV Quilting
Amanda @Quiltologie
Sharon @Yellow Cat Quilt Designs
Jen @A Dream and A Stitch
Jen @Faith and Fabric
Carole @Carole Lyles Shaw
Stephanie @Quilt’n Party
Susan @Sevenoaks Street Quilts
Katrin @Now What Puppilalla
Amista @Hilltop Custom Designs
Nicole @Handwrought Quilts
Marla @Penny Lane Quilts
Silvia @A Stranger View
Sarah @Smiles Too Loudly
Carrie @the zen quilter
Mary @Quilting is in My Blood
Velda @GRANNYcanQUILT

Wednesday, September 14th

Host: Stephanie @Late Night Quilter

Geraldine @Living Water Quilter
Kathy @Kathys Kwilts and More
Allison @Woodberry Way
Paige @Quilted Blooms
Kitty @Night Quilter
Mary @Strip Quilts Pass it On
Seven @The Concerned Craft
Olusola @Alice Samuel’s Quilt Co.
Ann @Brown Paws Quilting
Jodie @Persimmon + Pear
Vicki @Orchid Owl Quilts
Francine @Mochawildchild
Shelley @The Carpenter’s Daughter who Quilts
Jayne @Twiggy and Opal
Shannon @Shannon Fraser Designs
Lisa @Sunlight In Winter Quilts
Jessica @Quilty Habit
Cassandra @The (not so) Dramatic Life
Deanna @Stitches Quilting
Denise @Craft Traditions

Now that’s a phenomenal line up of bloggers!  Be sure to enter the giveaway to win prizes in celebration of this Cloud9 Cirrus Solds 100% Organic Cotton New Block Blog Hop.

Let me know if you have any questions about this pattern or suggestions to improve the pattern.  I can’t wait to hear what you think about the Blog Hop!

Happy Stitches,

Deanna Wall at Stitches Quilting


Now while you are gone I’ll be here Happily Stitching Away and coming up with brilliant quilting and sewing projects to share with all of you.  Be sure to subscribe to Stitches Quilting and follow me on Instagram and Facebook.  I have the most fun there engaging with all of you inspried by the beautiful things you are doing.   XOXODeanna Wall Stitches Quilting Stiching Happy

Posted on 3 Comments

Vintage Swimming Suit Quilt Block Tutorial Part 2 Womens Suit

Quilt Block Vintage Swimming Suits


Let’s start the tutorial on how to construct the Women’s Vintage Swimsuit part of this 12.5 inch block.

Vintage Womans Swimming Suit Quilt Block
Vintage Womans Swimming Suit Quilt Block. This side measures 6.5 inches wide by 12.5 inches wide.

Click Here, if you missed the first half of the tutorial constructing the Vintage Men’s Swimming Suit

Part 2: Women’s Vintage Swimsuit

To understand which sections we are referring to in the tutorial, below is a friendly diagram of the quilt block.

Vintage Swimming Suits Quilt Block Pattern


Download Vintage Swimming Suit Quilt Block Pattern NOW

Free pattern download, as seen in the 2017 Quilters Planner by Deanna from Stitches Quilting.

Construct Women's Section EE - Bottom Section of the Women's Bathing Suit

  • Cut 1 - Women's Bathing Suit Bottom from the Bordeaux Fabric
  • Cut - 13 Peach Sand templates provided in the Women's Bathing Suit printable.  The 13 Peach Sand Pattern Pieces are labeled WOMEN-L,M,N,O,P,Q,R,S,T,U,V,W,X, to reference where to stitch them.

Vintage Womans Swimming Suit Bottom

  • Stitch the Peach Sand WOMEN-M & N triangle pieces to the lower left and right edges of the Bordeaux Women's Bathing Suit Bottom.
  • Stitch the Peach Sand WOMEN-O & P triangle pieces to the upper left and right edges of the Bordeaux Women's Bathing Suit Bottom.
  • That completes Women's Bathing Suit Section FF.  Carefully press and Set Aside.

Construct Women's Section FF - White Belt Section of the Women's Bathing Suit

  • Cut 1 -  1.5 inches x 4.5 inches White Fabric for Waist White Belt
  • Cut 2 - 1.5 inches x 1.5 inches Peach Sand Fabric (Representing Q & R)
  • Stitch Peach Sand Women- Q & R Square pieces (2 Peach Sand cut 1.5 inches by 1/5 inches) to either side of the White Women's Bathing Suit Waist Belt.

Womans Bottom and Waist Swimming Suit Quilt Block

  • Section FF is complete.   This section needs to be squared up prior to attaching the white belt.  In this example I only square the top on the bottom piece before attaching the white belt.  Carefully press.
  • Join Women's Section EE to section FF.  Carefully press and set aside.

Womans Bottom Pieced with Waist Vintage Swimming Suit

Construct Women's Section GG - Bodice Section of the Women's Bathing Suit

  • Cut 1 - Lower Bodice from pattern piece out of the Daydream Blue Fabric
  • Cut 1 - Upper Bodice from pattern piece out of the White Fabric

Vintage Womens Bodice Straps Ready to Piece Quilt Block

  • Stitch Peach Sand Triangles S & T to the left and right lower corners of the Lower Bodice Daydream Blue.
  • Stitch the Upper White and Lower Daydream Blue Bodice pieces together.
  • Stitch the Peach Sand Triangles U & V to the left and right top corners of the Upper Bodice of White Fabric and part of the Lower Bodice of Daydream Blue Fabric.
  • Section Bodice GG is complete. Carefully press and set aside


Construct Women's Section HH - Straps Section of the Women's Bathing Suit

  • Cut 2 - 1.5 inches x 3 inches for left and right Women's Straps from White Fabric
  • Cut 1 -  2 7/8 inches x 3 inches for the center square between the two white straps from Peach Sand Fabric
  • Cut 2 -  2 inches x 3 inches for the left and right rectangles of either side of the two white straps from Peach Sand Fabric
  • Cut 1 - 3 inch x 3 inch square of Peach Sand Fabric to represent template @
  • Stitch the Peach Sand Square Women's W (3 inch x 3 inch square of Peach Sand Fabric) to the center of the two straps
  • Stitch the Peach Sand Rectangles Women's W & X to the left and right sides of the straps.

Vintage Womans Swim Suit Top Pieced

  • Section Swimming Suit Straps HH is complete.  Carefully press and set aside.

Finish Joining the Women's sections together in the following order

  • Join Women's Section FF to section GG. Carefully press
  • Join Women's Section GG to section HH.  Carefully press.
  • The Women's Bathing Suit part of the block is now complete and will need to be carefully squared up to 6.5 inches by 12.5 inches.

Vintage Womans Swimming Suit Quilt Block

Final Step:

Join the Women's Bathing Suit to the Men's Bathing Suit by stitching together after carefully pinning using a 1/4 inch seam.

Quilt Block Vintage Swimming Men & Womens Suits Attached together
Quilt Block Vintage Swimming Men & Womens Suits attached together 12.5 inches x 12.5 inches

Carefully press block.  Sit back and admire.  You have done a great job!

Click Here, if you missed the first half of the tutorial constructing the Vintage Men's Swimming Suit

Please comment below, I can't wait to hear from all of you!  Where have you enjoyed an ocean sunrise or sunset.  All of the blocks from the entire group are AMAZING!  Can't you imagine one of these blocks extra large size as one quilt?  Want to see more Vintage Bathing Suits and Ocean Quilt Blocks?  I will be posting more - sign up for Stitches Quilting email list to have them delivered to your inbox!  Which blocks from the entire 2016 Paintbrush Studio Blog Hop do you think would pair up great with the Vintage Bathing Suits?  Can you image this block with other colors or fabric selection?  I can't wait to hear your creative ideas?

Now don't stop here.... there are many more innovative Ocean Sunrise quilt blocks and full tutorials to see on the 2016 Paintbrush Studio Blog Hop!  . To view the blocks visually and quickly you can use the Stitches Quilting Pinterest Board I created below for the Blog Hop.


WEDNESDAY MARCH 30TH

MONDAY MARCH 28TH

Host: Yvonne @Quilting Jetgirl

Jess @Quilty Habit, Silvia @A Stranger View, Cristy @Love You Sew, Kelly @Quilting It Out, Renee @Quilts of a Feather, Bernie @Needle and Foot, Terri Ann @Childlike Fascination, Chelsea @Patch the Giraffe, Mary @Quilting is in my Blood, Diana @Red Delicious Life, Sarah @123 Quilt

TUESDAY MARCH 29TH

Host: Cheryl @Meadow Mist Designs

Kim @Leland Ave Studios; Andrea @The Sewing Fools; Cassandra @The (not so) Dramatic Life; Stephanie @Quilt’n Party; Irene @Patchwork and Pastry; Tish @Tish’s Adventures in Wonderland; Abby @Hashtag Quilt; Sarah @Smiles Too Loudly; Carrie @The Zen Quilter; Wanda @Wanda’s Life Sampler

2016 Paintbrush Studio New Block Blog Hop
Many thanks to Paintbrush Studio, our great sponsors and Blog Hop Organizers!
Deanna Wall Stitches Quilting Fall Sale 40 percent OFF your entire shopping cart
Posted on 18 Comments

Vintage Swimming Suit Quilt Block Tutorial Part 1 Mens Suit

Quilt Block Vintage Swimming Suits

When watching an ocean sunrise, we relish and hopefully memorize every moment! It’s intoxicating to feel the cool breeze with your toes in the sand, while deeply breathing the salty air.  It is mind boggling to reflect on how the land, sea and sky can be both powerful and peaceful at the same time.  We can only quietly watch as the evolving timed colorful masterpiece quietly disappears as quickly as it appeared. Don’t you just love to quietly sit there enjoying the live beauty and allow our minds to break from the hustle of worldly needs?

2016 Paintbrush Studio New Block Blog HopWe don’t all have the privilege to live by the ocean, but when I am by the ocean, I try to memorize these moments in my heart. Ever since there have been people on the earth by the sea, I am certain that the ritual we enjoy and feel from ocean sunrises and sunsets are similar. It is mystifying to think we are relishing things that have been experienced by many different civilizations, cultures, people and times.  That quiet private therapeutic moment with nature can make us realize how small we are in scale to the civilizations that came before us.

Paintbrush Studio is sharing an Ocean Sunrise color palette from their new line Painters Palette solids for us to use our imagination to celebrate these moments.  As you surf the World Wide Web, you will notice over 30 quilt bloggers creating new quilt blocks to try to express their joy through fabric providing full tutorials to inspire you.

2016 Paintbrush Studio New Block Blog Hop
Ocean Sunrise Colors (L to R): Midnight Blue, Daydream Blue, White, Peach Sand, Coral, Bordeaux

I can picture generations and different eras dressed in their ever evolving clothing styles enjoying these moments.   The one item consistent with people enjoying a sunset or sunrise is clothing and the fabric they are wearing.  Don’t we just love fabric?  Some of the fashions, style, fabric come and go with the ebb and flo of our cultures.

I love modern twists on vintage items.  For my block, I thought I would celebrate the modest vintage swimsuits that perhaps people were dressed in ready to leisurely enjoy the day along the sandy beaches.  I designed a modest man and woman’s swimsuit sitting next to each other on the sandy beach.  Perhaps watching the early morning sunrise or evening sunset, they would not only have their swimsuits but also a quilt to stay warm. (wink)

As stitching this block together we can think about and appreciate the civilizations before us that have enjoyed ocean sunrises and sunsets during daily life, times of war, contemplation, anticipation and peace.

To create this block I used the Painters Palette Midnight Blue, Daydream Blue, White, Peach Sand and Bordeaux Solids.  The methods used to create this block are piecing and strip piecing with a consistent 1/4 inch seam.  I love the striped vintage men’s swimsuit in Midnight Navy Blue and Daydream Blue.  The women’s swimsuit gives a nautical feel with the Bordeaux, White and Daydream Blue along with the white buttons to embellish the suit.

Quilt Block Vintage Swimming Suits


Part One Tutorial – Men’s Vintage Swimming Suit for an Ocean Sunrise 

1.  Read through the entire tutorial and instructions.  Stitch everything together with a 1/4  inch seam.

2. Here is a friendly layout of the Vintage Bathing Suits and the sections we will be working on.

Vintage Swimming Suits Quilt Block Pattern


Download Vintage Swimming Suit Quilt Block Pattern NOW

Free pattern download, as seen in the 2017 Quilters Planner by Deanna from Stitches Quilting.


3. Cut the fabric carefully according to the instructions and specifications provided in the tutorial.

4 .  To create this 12.5 inch block we are going to break the block into manageable pieces working on Part One: Men's vintage bathing suit section and  Part Two: Women's vintage bathing suit.

Part 1: Men's Vintage Bathing Suit

Construct Men's Section BB - Center Section of Men's Bathing Suit

  • Cut 3 - Midnight Navy Blue strips 1.5 inches by 7 inches
  • Cut 4 - Daydream Blue strips 1.5 inches by 7 inches
  • Sew 7 strips together alternating the Daydream Blue Strips with the Midnight Navy Blue strips.  Since you are working with 4 Daydream Blue strips and 3 Midnight Navy Blue strips each section will begin and start with a Daydream Blue strip.

Mens Swimming Suit Striped

  • Square up this section so it is 6.5 inches wide and 7.5 inches tall.  This will be the center body portion of the men's vintage bathing suit section MEN-BB.  Carefully Press and set aside.


Construct Men's Section AA - Men's Bottom Section for legs 


  • Cut 2 - Midnight Navy Blue Strip 1.5 inches by 3.5 inches
  • Cut - the 8 Peach Sand templates provided in the Men's Bathing Suit printable.  The 8 Peach Sand Pieces are labeled MEN-A, B, C, D, E, F, G, H, I, J to reference where to stitch them.  Use the 8 templates to cut pattern pieces from the Peach Sand fabric.
  • To ensure that the sizing is just right there is a special pattern piece labeled Men's Swimsuit Polygon Pattern Piece.  Be sure to trim the fabric of this connected section to the size of the Men's Swimsuit Polygon Pattern Piece.

Vintage Mens Shorts Swimming Suit Pieces

  • Arrange the 2 - 1.5 inch by 3.5 inch Midnight Navy Blue side by side lengthwise.
  • Stitch the Men's Peach Sand A & B small triangle pattern pieces individually to each center ends of the 2 - 1.5 inch by 3.5 inch Midnight Navy Blue pieces.  Stitch the two pieces together lengthwise.  Carefully Press and set aside.

Vintage Mens Swim Suit Legs Pieced

Join Men's Sections AA to BB 

Join Men's Vintage Swimming Suit Section AA to Men's Vintage Swimming Suit Section BB. This is the lower portion of the Men's Vintage Swimming Suit with the center Peach Sand triangle as the bottom.

Vintage Mens Swim Suit Join Body to Legs

Stitch Men's Peach Sand C & D long triangle pattern pieces to the bottom left and right sections of the lower portion of the Men's Vintage Swimming Suit (Combined sections just stitched together of Section MEN-AA and MEN-BB).  Carefully Press and set aside.


Construct Men's Section CC - Men's V Neckline 

  • Cut 2 - Midnight Navy Blue Strips 1.25 inches by 7 inches
  • Cut 1 - Daydream Blue Strip 1.25 inches by 7 inches.
  • Alternating 3 of the 1.25 inch by 7 inch blue strips, stitch together 2 Midnight Navy Blue Strips with 1 Daydream Blue Strip in the center.
  • Cut this set of strips in half and stitch Peach Sand Pattern Piece E & F

Vintage Mens Swim Suit Neck Line

  • Sew the set of strips back together along the long side of the triangles E & F.  Attach the Men's V Neck Line section to the Men's Main Swim Suit Section.

Mens Swim Suit Neck attach to Body web

  • Stitch the Peach Sand Pattern pieces G & H to the left and right edges of the Polygon Pattern Piece.
  • Men's Vintage Swimming Suit Section CC is now complete.  Carefully Press and set aside.


Join Men's Section CC to BB together.

Complete shape of Men's Swimming Suit Section by sewing both Peach Sand Pattern Pieces F & G to the left and right top sides of Section CC combined with Section BB.  Carefully Press and set aside.


Construct Men's Section DD - Men's Upper Straps to Suit

  • Cut 2 - Midnight Navy Blue Squares 1.25 inches by 1.5 inches
  • Cut 4 - Daydream Blue Squares 1.25 inches by 1.5 inches
  • The 2 bathing suit straps are constructed by sewing 2 Daydream Blue Squares with 1 Midnight Navy Blue Square in the center.   The final size of the bathing suit straps will be 3.25 tall by 1.5 inches wide.  Be careful on this step to stitch the bathing suit straps so the stripes when finished will be 1.5 inches wide and 3.25 tall.
  • Join the two Upper Straps of  Suit with Peach Sand Pattern Square Piece H (2.5 inches x 2 7/8 inches) to either side of the 3.25 strap length.

Mens Swim Suit Straps web

  • Stitch Peach Sand Pattern Pieces of I & J (1.5 inches by 2.5 inches)to either side of the bathing suit  straps.  Carefully Press and set aside.


Join Men's Section CC & DD together.

  • Finishing the Men's Bathing Suit Block Section

Mens Swim Suit Join Straps to Body web

Now that the Men's Bathing Suit is constructed, carefully press. The block needs to be carefully squared to the dimensions of 6.5 inches by 12.5 inches.

Mens Vintage Swim Suit Quilt Pattern

Click HERE - For the second half of the tutorial - Part 2: Women's Vintage Swimsuit

Please comment below, I can't wait to hear from all of you!  Where have you enjoyed an ocean sunrise or sunset.  All of the blocks from the entire group are AMAZING!  Can't you imagine one a these blocks extra large size as one quilt?  Want to see more Vintage Bathing Suits and Ocean Quilt Blocks?  I will be posting more - sign up for Stitches Quilting email list to have them delivered to your inbox!  Which blocks from the entire 2016 Paintbrush Studio Blog Hop do you think would pair up great with the Vintage Bathing Suits?

Now don't stop here.... there are many more innovative quilt blocks and full tutorials to see on the 2016 Paintbrush Studio Blog Hop! To view the blocks visually and quickly you can use the Stitches Quilting Pinterest Board I created below for the Blog Hop.


WEDNESDAY MARCH 30TH


MONDAY MARCH 28TH

Host: Yvonne @Quilting Jetgirl

Jess @Quilty Habit, Silvia @A Stranger View, Cristy @Love You Sew, Kelly @Quilting It Out, Renee @Quilts of a Feather, Bernie @Needle and Foot, Terri Ann @Childlike Fascination, Chelsea @Patch the Giraffe, Mary @Quilting is in my Blood, Diana @Red Delicious Life, Sarah @123 Quilt

TUESDAY MARCH 29TH

Host: Cheryl @Meadow Mist Designs

Kim @Leland Ave Studios; Andrea @The Sewing Fools; Cassandra @The (not so) Dramatic Life; Stephanie @Quilt’n Party; Irene @Patchwork and Pastry; Tish @Tish’s Adventures in Wonderland; Abby @Hashtag Quilt; Sarah @Smiles Too Loudly; Carrie @The Zen Quilter; Wanda @Wanda’s Life Sampler

 Many thanks to 2016 Paintbrush Studio Ocean Sunrise sponsors and blog hop organizers!
Deanna Wall Stitches Quilting Fall Sale 40 percent OFF your entire shopping cart


Posted on 63 Comments

GIVEAWAY Farm Girl Vintage Book by Lori Holt and 18 Quilt Fat Quarter Kit

Farm Girl Vintage Book Fabric Giveaway

The Giveaway is now complete! SALE Farm Girl Vintage Book & Fat Quarter Bundle.

Buy NOW before stock runs out!

Buy Nowfarm girl vintage Lori HoltFarm Girl Vintage Book

Sale $17.25  Reg $28.74


Buy Now18 Fat Quarter Kit for the Farm Girl Vintage Quilt Book by Lori HoltFarm Girl Vintage 18 Fat Quarter Bundle

Sale $29.32 Reg $44.12

I want to thank everyone that participated in the Farm Girl Vintage Book with 18 Fat Quarters from Stitches Quilting Giveaway as it was excellent fun getting to know all of you!  Several more Giveaways coming soon!  I learned so much from doing my very first one and got excellent suggestions and feedback to improve!

Zombie Apolcalypse Giveaway with Doll and Dog

Our next giveaway is a Fall Halloween Giveaway Fat Quarter Collection of Emily Taylor’s Zombie Apocalypse for Riley Blake that includes a specially designed panel by Emily Taylor to make a Zombie Doll and Zombie Dog!  We have included a tutorial on how to assemble the Zombie Doll and Dog with some extra embellishments.  To purchase your own Emily Taylor’s 9 piece Fat Quarter Kit with Zombie Doll and Zombie Panel here before they sell out.  We also have extra Zombie Doll and Dog panels designed by Emily Taylor for you to purchase without the Fat Quarter Collection in case you already have Zombie Apocalypse yardage in your stash.  To enter the Stitches Quilting Fall/Halloween Zombie Apocalypse Giveaway click here!


Farm Girl Vintage by Lori Holt Book and 18 piece Fat Quarter Collection

The Giveaway is now finished and the winner is: Jacklynn Grimm!  We are so excited that she has received her package in the mail of the Farm Girl Vintage book with 18 Fat Quarter to start making those excellent block designed by Lori Holt of Bee in My Bonnet.  If you would like to purchase this kit of the Farm Girl Vintage Book with 18 Fat Quarters from Stitches Quilting then click the link.  For just the purchase of the Farm Girl Vintage Book click here and for the purchase of the Stitches Quilting Farm Girl specially selected Fat Quarter collection click here.


It is time for Stitches Quilting to offer their first Giveaway of Farm Girl Vintage Book with 18 Quilt Fat Quarter Kit!  We hope this is something that you will like!

ENTER NOW!  The Giveaway is for the Best Selling Farm Girl Vintage Book by Lori Holt with Bee In Your Bonnet AND an 18 Quilt Fat Quarter Kit to start stitching away from this inspiring book!

Celebrate with us our 1st ever giveaway with the hashtags of:  #stitchesquiltinggiveaway #fabricgiveaway #quiltgiveaway

You can enter multiple times through the Rafflecopter link below and to  get additional entries go to @stitchesquilting Instagram Feed and the Giveaway Post  and follow instructions within the post.  Share and tag this page on Facebook, Twitter, Pinterest, Email and MORE!   Subscribe to Stitches Quilting website online store and blog for an additional 5 entries.

There will only be one winner that will be notified within 48 hours after the giveaway.  Absolutely no purchase is necessary for the giveaway!  I just want everyone to win something so you can use the coupon code of Expired XXXXXX for 30% off your shopping cart and there is free shipping if you spend $50 or more.  Expect a total of four giveways over the course of the next 4 weeks so subscribe to stay tuned in for more awesome quilty giveaways coming your way!

Enter the giveaway below….  The giveaway starts August 7, 2015 and will end August 14, 2015 at midnight!

CLICK HERE TO ENETER STITCHES QUILTING GIVEAWAY FOR Farm Girl Vintage Book with 18 fat quarters Rafflecopter giveaway
CLICK HERE TO ENTER GIVEAWAY with Rafflecopter
Deanna Stitching Through Life

Farm Girl Vintage Lori Holt Quilt Book