Posted on

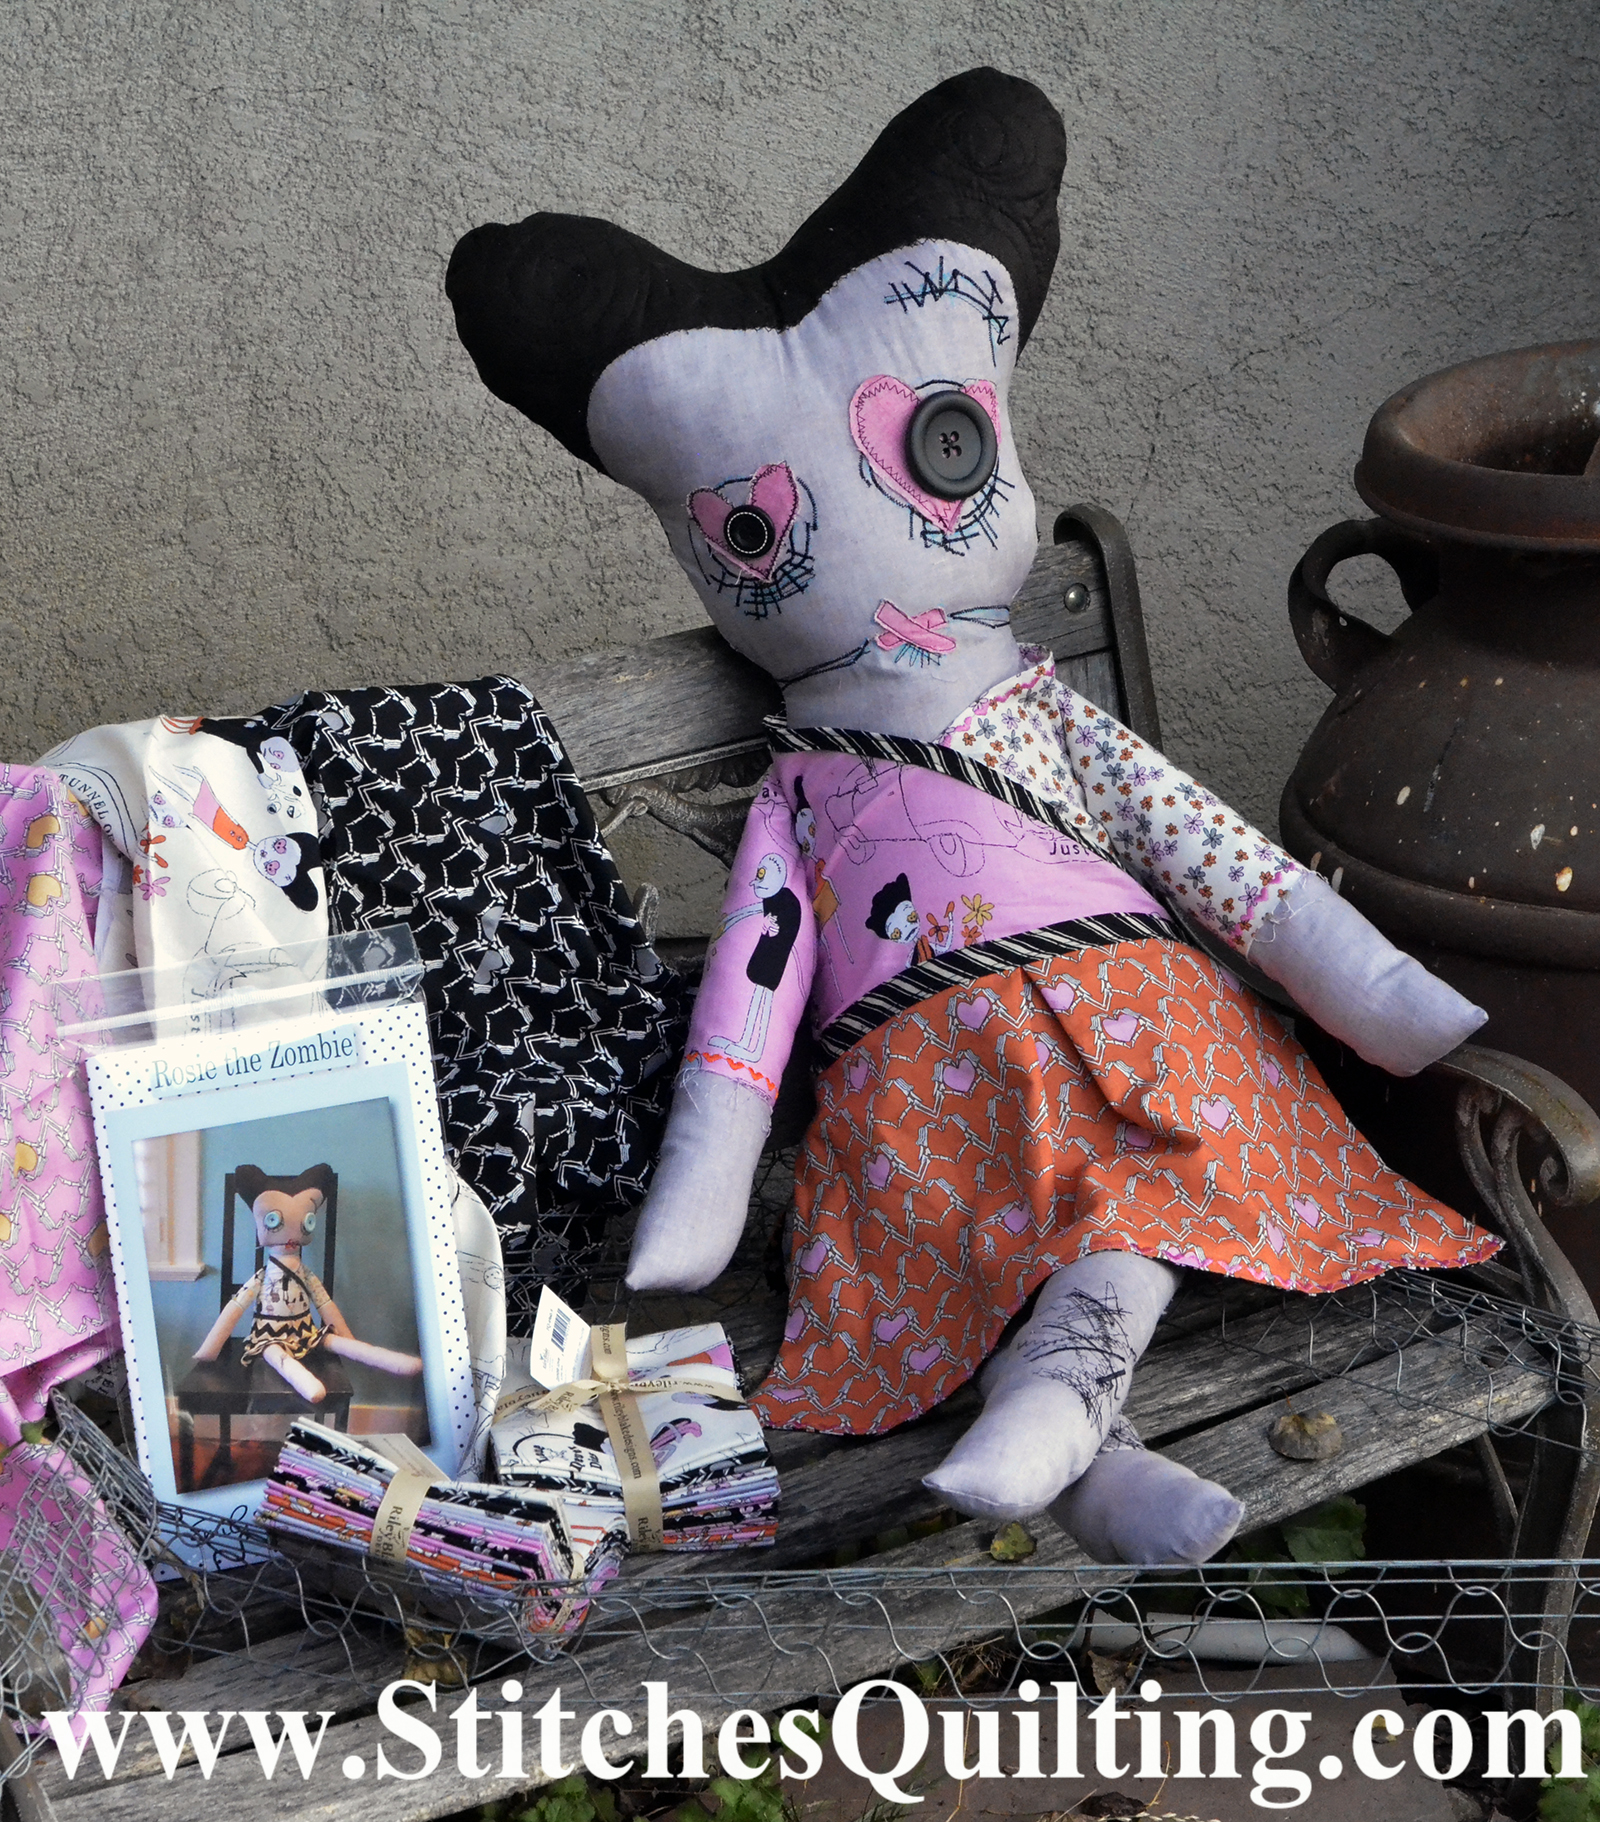
Tutorial for Rosie the Zombie Doll learn basic sewing techniques the FUN way!

Easy Sewing Tutorial with lots of photos and video to learn basic skills while sewing something as fun Rosie the Zombie Pattern by Emily Taylor Designs with Zombie Love fabric!

I was able to construct Rosie from only one Fat Quarter collection of Zombie Love Fabrics and Riley Blake’s Slate Gray Shade.  If you would like a kit with the pattern and all the extra pieces it is available for sale (click this link).

Rosie Zombie Doll Pattern by Emily Taylor

Rosie Zombie Doll Supplies

Before cutting out the paper pattern completely for Rosie’s body front and back, I cut out the pattern construction markings and taped them to the front of  the pattern within the cutting line.  Cut the Body Front and Back out of a gray fabric.

Before cutting out the paper pattern completely for Rosie’s body front and back, I cut out the pattern construction markings and taped them to the front of the pattern within the cutting line. Cut the Body Front and Back out of a gray fabric.

Cut 2 pieces each of the arm and leg following the fabric grainline on a gray fabric.  Here I used Riley Blake’s Gray marble.   Set the legs aside because you are going to stitch on the legs with black thread the “scratches”.

Cut 2 pieces each of the arm and leg following the fabric grainline on a gray fabric. Here I used Riley Blake's Gray marble. Set the legs aside because you are going to stitch on the legs with black thread the "scratches".

Cut out Rosie’s Front of Hair and Back of Hair in a black fabric.  At the same time of cutting out the hair, I also cut out batting to match and set these aside.

Cut out Rosie’s Front of Hair and Back of Hair in a black fabric. At the same time of cutting out the hair, I also cut out batting to match and set these aside.

For the Pink Main Zombie Love Fat Quarter, cut out the Front of blouse A, Back of Blouse and cut 1 Sleeve because the sleeves will be two different fabrics.  Please note, we are laying the pattern pieces with the grain line of the Fat Quarter which is parallel to the selvedge.  I also tried to lay out the pattern pieces to capture the Zombie scenes on the fabric.

For the Pink Main Zombie Love Fat Quarter, cut out the Front of blouse A, Back of Blouse and cut 1 Sleeve because the sleeves will be two different fabrics. Please note, we are laying the pattern pieces with the grain line of the Fat Quarter which is parallel to the selvedge. I also tried to lay out the pattern pieces to capture the Zombie scenes on the fabric.

We are now cutting out Rosie’s shirt accent color pieces with a contrasting sleeve  and shirt front.

We are now cutting out Rosie’s shirt accent color pieces with a contrasting sleeve and shirt front.

I thought the orange skeleton hands with hearts would be perfect for Rosie’s skirt.  If you are making Rosie more for a Valentine project perhaps you would like the pink skeleton hands fabric.  A fat quarter is the perfect size to cut the skirt front and back.  Be certain to line of the top and bottom of the skirt with the pattern of “lines/stripes” of the fabric while cutting with the grain line.

I thought the orange skeleton hands with hearts would be perfect for Rosie’s skirt. If you are making Rosie more for a Valentine project perhaps you would like the pink skeleton hands fabric. A fat quarter is the perfect size to cut the skirt front and back. Be certain to line of the top and bottom of the skirt with the pattern of “lines/stripes” of the fabric while cutting with the grain line.

Notice that I am now cutting a lining for Rosie’s skirt from the black flower pattern in the Zombie Love Fat Quarter Collection.  You can see a bit of the orange skeleton fabric peeking out below.

Notice that I am now cutting a lining for Rosie’s skirt from the black flower pattern in the Zombie Love Fat Quarter Collection. You can see a bit of the orange skeleton fabric peeking out below.

Here are all the pieces of Rosie laid out so you can get an idea of how the pieces work together.  Notice the accent stitches along the sleeves and that the homemade bias is not yet sewn to the skirt back.

Here are all the pieces of Rosie laid out so you can get an idea of how the pieces work together.

Here are the clothing pieces sewn together for Rosie the Zombie.  Can you see it starting to come together?  Here Rosie’s clothing is now pinned to the body pieces getting ready to be stitched together.

Here are the clothing pieces sewn together for Rosie the Zombie. Can you see it starting to come together? Notice the accent stitches along the sleeves and that the homemade bias is not yet sewn to the skirt back.

You can notice that I layered Rosie’s Hair with batting and quilted hair designs to give Rosie more texture.

You can notice that I layered Rosie’s Hair with batting and quilted hair designs to give Rosie more texture.

Notice the stitching on Rosie’s face.  First I transferred the face pattern to the gray fabric with a disappearing fabric pen.  Then we stitched away with a variety of satin and zig zap stitches.  I also added 2 pink heart for her eyes.

Notice the stitching on Rosie's face. First I transferred the face pattern to the gray fabric with a disappearing fabric pen. Then we stitched away with a variety of satin and zig zap stitches. I also added 2 pink heart for her eyes.

Now you assemble the Rosie the Zombie according to the pattern instructions by Emily Taylor Designs.  A couple tips would include to be sure to match up certain points like her head, neck, bias tap for skirt front and back etc..   I also customized the pattern by added some bloomers sewn into her using the extra fat quarter pieces.

Rosie is almost three feet tall including her skinny legs.  She isn’t too big but definitely a fun accent piece to have in your home to bring some delight!

I am attaching some video that I did when periscoping this tutorial and you might find it helpful but video from Periscoping isn’t ideal because you are filming live and just awkward things happen.   To follow me on periscope my handle is @stitchesquiltin

Easy Sewing Tutorial of Rosie the Zombie to learn lots of techniques

Please let me know if you have any further questions.

Deanna Stitching Through Life

Posted on

Sewing Tutorial Zoe Zombie Doll and Bones Immortal Dog

Zoe Zombie and Bones

Do you happen to pick up just fantastic fabric panels from time to time but somehow don’t seem to get them done?  Sometimes I am disappointed with the end result that doesn’t look quite like I had imagined!  I have to say that this Zoe Zombie Doll and Bones her Immortal Dog did not disappoint me!  What do you think?

Zoe and Bones Good

The trick for me on this panel was that before I even cut the panel apart I long armed the pieces giving each one structure and form with the 80/20 Warm and Natural Batting and muslin backing.  The tutorial for How to Quilt a Fabric Panel and particularly the ideas to accentuate Zoe and Bones.   I have lots of thoughts, pictures and actual video of the tutorial for Zombie Apocalypse Fabric Panel by Emily Taylor for Riley Blake Designs.  If you are interested in purchasing this fabric panel it come free when you purchase a Zombie Love Fat Quarter Kit by Emily Taylor Designs for Riley Blake Fabric

I have to tell you that my family and I really enjoyed making Zoe and Bones come to life for our Fall Festivities!

Zoe the Zombie Doll body part pieces that you will need.

Zoe Zombie Doll Arms Legs Blog1600 Zoe Zombie Doll Body Blog1600

Bones the Immortal Dog body pieces that you will need.

Bones Zombie Body Blog1600Bones Zombie Ears Belly Blog 1600

Additional Supplies Needed:  a NEW Demin Jean Needle for your sewing machine, Gray Thread and Stuffing

Let’s Get Started to Bring to Life Zoe the Zombie Doll:

  1.  Cut out the quilted body part pieces for Zoe.  For the arms and legs, I left about a 1/4 inch seam allowance around them but with the Zoe Front and Back Body pieces I cut them along the outer edge of the doll.  Be sure to mark where the location of the arms are on the doll front and back pieces.
  2. The arms and legs are constructed in a tubular manner.  Fold one arm piece in half with right sides together and sew around the arm starting at point A and ending at point B.  Turn inside out and stuff until firm.  Repeat with the second arm.  Set aside arms.Zoe Zombie Arm
  3. Fold one of Zoe’s legs in half with right sides together.  Sew around the leg, leaving the straight edge open.  Turn inside out, stuff until firm.  Repeat with other leg.
  4. Use a fat knitting needle or other blunt object to push the seams of the arms and legs all the way out after turning them inside out.Zoe Zombie Doll wm
  5. I did not close the openings of the arms or legs and did not allow the stuffing to poof out where I was going to attach the arms and legs to the body of Zoe.  We already have a lot of layers to sew through with the batting and fabric.  You can see in the picture that I have positioned Zoe’s Arms and stitched them to her body.Zoe Arm pinned and stitched
  6. Now attach the legs to the body bottom.  (Refer to photo)Zoe Legs Stitched On
  7. Match up the front and back body pieces of Zoe the Zombie Doll.  It is important to notice that you want to make sure that her hair, neck, dress white stripe are matched up on the body as those will be noticeable pieces to not have accurately matched when turned inside out – see photos and video for additional help on this.
  8. First stitch her head together first matching her collar and hair on each side.Zoe Front and Back Step 3
  9. Leave the legs hanging out with the arms tucked in, stitch the front and back of the Zoe the Zombie bodies together Leaving the bottom of her dress open to turn her inside out.Zoe Front and Back Step 2
  10. Stuff Zoe the Zombie doll firm and hand stitch her dress bottom completely closed.Zoe Stitched Together
  11. There she is!  Embellish her with some of your own home elements or leave her just exactly as she is!  Sweet isn’t she?


Let’s Get Started to Bring to Life Bone’s the Immortal Zombie Dog:

  1.  Cut out all of Bone’s Quilted body part pieces of the left body side, right body side, underbelly, front ear piece and back ear pieces.Bones Ears
  2. Sew together Bone’s front and back left and right ear pieces.  The back side is polka dotted and the right side is black.  Turn the ears inside out and finger press the quilted ears.  No stuffing is needed as they have great structure to them.
  3. Fold the underbelly of Bones along the dotted line.  Pin the underbelly to match “E” and “F” side of the left quilted body then stitch together.  Next pin the underbelly to match along with the “D” and “C” sides of the right quilted body finish stitching the underbelly to the right side of the quilted body.  Bone’s is starting to take shape eh?Bones Underbelly
  4. Line up the ears on the left side of the Bones body and stitch into place.
  5. If needed, trim some of the batting from the ear seam when you are attaching them to the body to have less fabric to sew through.  I decided to offset the ears when stitching the top of the body together so my sewing machine needle would smoothly go across all layers.  (See photo)Bones Underbelly collar matched
  6. It is important to make sure the Bone’s green collar is matching under Bone’s chin and the back of his neck.  These would be obvious places that one would notice if his body was not stitched together right.Bones CollarBones Underbelly collar grn matched
  7. Start stitching the top part of Bone’s right and left side of the body together starting at Bone’s neck to ensure the matching of his green color and then leaving open a 2 to 3 inch space at the back of his body below his tail.Bones all Stitched
  8. Turn Bone’s body inside out from the opening.  Use a long blunt knitting needle or object to ensure that all seams are pushed all the way out.
  9. Stuff Bone’s the Immortal Zombie Dog and hand stitch his opening completely closed
  10. There he is!  Embellish Bones with some of your home element or leave him just exactly as he is!  Darling isn’t he?Zoe and Bones GoodZoe Zombie and Bones


I would just love if you emailed me a photo of own created versions of Zoe and Bone’s!  I would love to see how they turned out.  If you get stumped anywhere do not hesitate to email me!

What extra ideas do you have to embellish Zoe or Bones and share your ideas or tips to construct them.  Post your photos and #ZoeZombieBonesDog so all can search them and see your fantastic ideas!  YEA!  It sure feels great to share!

Posted on 1 Comment

Have you purchased a fabric panel and don’t know what to do with it? For Fall Fun, here is Zoe the Zombie and her Zombie dog Bones!

Zombie Apolcalypse Zoe Zombie Doll Bones Dog Panel

Have you purchased a fabric panel and don’t know what to do with it?  Have you used panels before and then disappointed with your effort and money spent?

We have some ideas for YOU!  I am going to break down how to take a panel and figure out how to embellish it so it takes form into something that is unique and loved!  You will feel great about the efforts you spend and the new skills you learned.  I have purchased several panels through the years and rarely turn back to actually do anything with them.  In the spirit of Halloween Fun, let’s break down this darling panel created by Emily Taylor Designs for Riley Blake.  This panel was a coordinate with Emily Taylor’s Zombie Apocalypse 2014 Fabric Collection.

Zombie Apocalypse by Emily Taylor Designs for Riley Blake Fabrics

For Fall 2015, Emily Taylor designs with her talented skills created the Zombie Love collection for all of us to play with!

Zombie Love by Emily Taylor Design for Riley Blake

Zombie Love is just beyond adorable!  I love studying her whimsical artwork and sweet loving Zombie story lines on her fabric!  Darling!  We will get to more of that in another post!

Let’s go back and focus on the 2014 Zombie Apocalypse panel we are going to break apart today.

Zombie Apolcalypse Zoe Zombie Doll Bones Dog Panel
Zombie Apolcalypse Panel Zoe Zombie Doll and Bones Dog Pattern

You can see here there is a darling doubled sided Zoe the Zombie doll that has one side featuring her loveliness and the other side featuring her zombiness.  Zoe the Zombie has cute tubular arms and legss to attach.  Emily Taylor just couldn’t stop with her talent with a Zoe Zombie Doll, but Emily’s imagination gave Zoe a companion of “Bones”, the Zombie Dog!  How darling is that?  Bones the Zombie Dog has two body sides, an underbelly along with darling floppy ears to attach!

There have been times that I will create something from a panel but it lacks any shape or form to make the sewable item look like what I imagine it should be.  Well to solve that issue in sewing you use interfacing right!  This time we are going to quilt this panel with Warm and Natural 80/20 Batting and 100% cotton muslin fabric backing.   This type of panel would be fun to learn and experiment how to quilt on a domestic sewing machine.  Challenge yourself and play with a panel to learn quilting techniques on your sewing machine.  I have a long arm quilting machine and going to load this sweet panel on that machine and doodle away.


I brainstormed what might look good for this Zombie panel and thought of things associated with Zombies while not being morbid.  I’m more of a playful Zombie Halloween person not the scary kind run away from.  Being the conservative person that I am,  I do not find enjoyment in watching scary movies; life is already a bit to scary to add more to it.  I do have immediate family members that enjoy scary movies.   We do have Walking Dead fans in our family and I thought they might appreciate me “entering their world” making some fun Zombie items for them.   Back to brainstorming… I find that Zombie culture has plaid in it, flowers, humor, and more.


When I was long arm quilting this panel, I felt like I was doodling with Emily Taylor and just simply embellishing her darling drawings!  I used shiny black thread with on the hair and eyes.  I used a metallic light green thread that worked great on all the various colors in the panel and made the quilting simpler by not have to change threads for the rest of the parts.

Zoe Zombie Doll Body Blog

I decided to put flowers on Zoe the Zombie’s dress, accent her hair with waves, accentuate her eyes with more eyelashes, give the collar a bit of a lacey look and finally give her skirt some swirls.  On the other hand, Zoe the Zombie’s scary side I quilted her eyes to look more zombieish, accented her hair with zig zags, scratched up the tares in her dress, and more.  You can study the images to see more.

Zoe Zombie Doll Arms Legs Blog

Zoe’s legs and arms are sewn in a tubular fashion so there wasn’t a zombie and non-zombie side but the panel seemed to have a zombie arm/leg and regular arm/leg.  After making this observation, I decided to quilt the zombie arm/leg a bit scary and the non-zombie arm/leg a bit friendly.

Bones Zombie Body Blog

Zoe’s Zombie dog Bones is already darling but I decided to quilt him with abstract non-descript “bones” on his body.  I accented his eyes and features along with quilting a plaid pattern on his nose.

Bones Zombie Ears Belly Blog

On the outside of Bone’s ears, I quilted lines between the polka dots and the inside of his ears did a circular pattern.

Videos of the long arm quilting of the panel are included in the post if you want to watch it in action.  Remember I am trying to be lose with my quilting of the panel to give it a whimsical look.  If you are new to quilting it is best to not try for perfection but instead be “consistently inconsistent” and you really end up with a great result.  It pains me to think of the unpicking going on with quilting. Remember quilting is a fluid art with each person having their own fingerprint and style.  Find your style and let it flow throughout your work.  This video was filmed as a live Periscope Video with people asking questions during the video.  After watching it I can’t believe the number of times I said “um” YUCK!  I promise my next live video will NOT have that going on!  The first person to watch the entire video and count the number of “um”s that I said and be the first to make a remark in the comments of this blog post, will have a quilting Halloween surprise mailed to them!  The video was also a bit shakey and I will improve upon my video set up while long arm quilting and not have the video camera attached to the machine.

Tomorrows post will be on assembling and stitching together Zoe the Zombie Doll with her companion dog Bones which will be a written photographed and video post from streaming live on Periscope.  If you are new to Periscope then it is an app you download on your phone, you can follow me at stitchesquiltin for live broadcasts and inspiring chats.  You can watch the video and interact with me live by making comments and I can answer your questions.  Let’s have some creative fun together.

Zoe and Bones are definitely going to bring smiles to my family members!  You can still purchase this Zombie Apocalypse Panel at Stitches Quilting with either the Zombie Love or Zombie Apocalypse Fat Quarter Kit.  So pull out fabric panels that you may already own and let’s get them put together for possible holiday gifts this season!  I am a firm believer in using up what you have and put it to good use!  Maybe this tutorial will motivate you to pull out some panels laying around transforming them into something unique!  Please share comments below if you have been disappointed with panel results yourself and any tips you have used to make them come to life.  I would also LOVE your comment of other ideas you have for quilting Zoe the Zombie and her dog Bones along with use of the fabric collections!

Deanna Stitching Through Life


Zombie Quilted Pinterest Long 238x600